Wednesday, April 29, 2009

Vegan Béchamel Sauce


I realize that my savory/meal posts are very inconsistently scattered between my baking posts, but that does not mean I am less committed to cooking for daily meals - I just tend to keep things sparsely healthy for those meals, so it's a little less interesting and less photogenic to post those items. Plus I really get excited about sugar and butter and all that good stuff!

Still, I was very enthused about this little, versatile item when it popped up on Chocolate and Zucchini, and ran out to buy some soy milk in order to whip up my own Swiss Chard gratin (pretty stalks of rainbow Swiss chard cooking in the photo above).

There are just so many reasons to make this sauce: it's quick and easy to make with ingredients you probably keep around the house, lower in fat than normal béchamel, vegan, creamy, and tasty enough to use as a base for many different dishes. If you're not vegan, add an egg to the sauce and you get an even richer healthy base for your dish. I didn't have the nutmeg, but it was still good.

I have also fallen in love with Gruyère cheese recently (how often do I say that about a food item?), especially when added to greens and whole wheat pasta, so I was pleased to see that this gratin was topped with the nutty mountain cheese. Okay, the recipe actually calls for Comté, but Gruyère was the much cheaper option at my store, and very good. It also makes use of bran (wheat bran, in my case) instead of bread crumbs as a crisp upper layer, another healthy substitution that won me over.

You should now be convinced that it's time to make a healthy, tasty meal! I've included a series of photos below which portray the changes in the sauce as the milk gets incorporated; sorry there's not better lighting over my stove!

Vegan Béchamel Sauce, from Chocolate and Zucchini

4 teaspoons vegetable oil
2 tablespoons flour
240 ml (1 cup) plain non-dairy milk, cold or at room temperature
salt, pepper, nutmeg

Heat the oil in a small saucepan over medium heat. Add the flour, stir it in quickly with a wooden spoon, and cook for 2-3 minutes, stirring continuously, without coloring (that's a roux blanc).

Remove from the heat, add a little of the milk, whisk it in to form a smooth mixture, then add the rest of the milk over medium heat, a little at a time, whisking well between each addition. Bring to a gentle simmer and cook for 5-7 minutes, stirring continuously, until thickened to a velvety consistency. Remove from the heat, season with salt, pepper, and nutmeg, and use while still warm.

Follow the photo series below if you are uncertain of how the sauce should look as you work the milk in.

Stirring the flour into the oil:


Adding the first bit of milk off the heat:


Next additions of milk:


Starts smoothing out:


Before cooking it the 5-7 minutes:


The velvety consistency, sauce sticking to the sides of the pan:


This is not a technical explanation, just a description of how it worked for me. Happy sauce making!

Thursday, April 23, 2009

The Bazaar by José Andrés


I'm sure it's obvious that my foodie instincts lean towards the homemade, bakery fare, and ethnic foods, but make no mistake: I am happy to have a good formal restaurant dinner any time. In this case, I had a great dinner experience at The Bazaar by José Andrés in Beverly Hills. Thanks to a new foodie friend (writer of movies and munchies) we got reservations for a Wednesday night in this Philippe Starck decorated space. Between the four of us at dinner, we were able to sample a good number of dishes and keep the price down to about $75 per person including tip and tax, although excluding alcoholic beverages.


I honestly didn't expect to like the food that much; I expected to experience new combinations of flavors and textures, taking a bite or two of each dish just for a good try. Having read a tad about molecular gastronomy on various blogs, I knew that it could tend towards the extremes of non-traditional food - and so I ate a mini-meal beforehand! I think that this decision allowed me to enjoy the food much more, since I was not eating to be full, but to taste.

Generally it felt like the tapas ingredients were fresh, high quality, and well prepared, but I was most impressed by the intentional composition of each dish. I felt like someone had played with the food, and I was there to sample the results of their playtime.


At the server's recommendation, we started with lovely crisp, salted sweet potato chips and an aerated yogurt dip with olive oil and hints of anise. I thought the little brown paper bag was a fun touch.


Then the foie gras lollipops came...yes, lollipops, wrapped in cotton candy! Can you believe it? When popped in the mouth, the sugar made a nice case for the smokey and salty foie gras cube in the center. This was actually my first taste of foie gras ever, since the idea of having the fatty stuff in my mouth has never appealed to me, but I mostely enjoyed this. If there had been a tad less of the foie gras in the mouth at the end, I would have enjoyed it completely.


One of the general themes that I enjoyed throughout the evening was the use of fresh citrus, and this artichoke heart salad set the tone, hearts nestled in a citrus sauce with peeled slices of grapefruit, blood, orange, and navel orange, with pomegranate seeds and fresh herbs.


This traditional tapas platter of 3 types of jamon brought lots of salty smokiness to the table...


accompanied by Catalan-style barely-toasted bread spread with shredded tomato.


These "Philly Cheesesteaks" were a pocket of airbread filled with cheese and topped with slices of tender steak and chives -


See what I mean about food play?


The Japanses tacos were the least popular of the evening, with overcooked eel (although I am not familiar enough with eel to be able to tell the difference), but cute in their cucumber shell.


The "Not your everyday Caprese salad" with balls of liquid mozzarella, peeled cherry tomatoes, pesto, basil leaves, and croutons.


A colorful mouthful!


The citrus returns in a brussel sprout salad, green apple tucked into the brussel sprout cups, citrus sauce, and lemon "air" to top.


Very fresh brussel sprouts. The foam was a little something extra for flavor, texture, and looks.


Perhaps not the best looking, but very good tasting tender lamb slices hidden under this potato foam.


We moved over to the Patisserie area for dessert in order to have access to the full dessert menu.


The waitress that moved us forgot to let the dessert staff know we were there, but eventually a waitperson came to take care of us.


The dessert area has funky decor, and was located practically in a boutique, which was odd to me - I didn't really want to be surrounded by cases of merchandise, even if it was high-end...


But the dessert selection was pleasing, and I was happy with my choices: green tea shortbread cookie, sesame seed croquant, chocolate tablet with salt, and passionfruit marshmallow. Chased by 4 plated desserts!


With a very bitter espresso; I normally enjoy espresso after dinner, but this one was too strong.


Flan and vanilla bean whipped cream, smooth and caramelly, lovely.


The small dark chocolate cake, filled with a chocolate mousse and topped with salted caramel sauce and chocolate nibs. Loved the caramel sauce.


Clementine sorbet, with some lemon sorbet, fruits, and more foam - very refreshing and light.


And, finally, the coconut floating island, which had been frozen in liquid nitrogen as videoed here. Creamy and light, with passionfruit syrup and mint leaves.


The liquid nitrogen left it soft while still holding shape, with a more solid base.


All in all, a unique experience for me, which I enjoyed for its visual aesthetics and fresh flavors. While half of our dinner party were not as pleased with the experience, I believe expecting play rather than a filling, comforting meal would make Bazaar a fun meal for anyone willing to drop the cash.

Wednesday, April 22, 2009

Chocolate Macaron Success!


Finally, finally, on my fifth attempt and third recipe, I found success in the macaron world. Leave it to Macaron God Pierre Hermé to set me right! Not only are these feet just right, but the texture is a wonderful balance of chewiness and lightness, the tops formed a nice shiny crust, and the ganache is the smooth happiness in the middle.

Of course, now that I re-look at photos from my Paris trip last year I can recall exactly how perfect PH's macarons were, much finer in texture than mine, and lighter. But still, as progression from my previous attempts AND in comparison to the MANY disappointing American macaron imposters I've tried (Boule? Paulette? most of San Francisco?), these were quite a success. I even got a real Frenchman to try them, and his approval (as a wealthy Parisian well acquainted with Pierre Hermé) should serve as objective proof that these are the real deal!


One of you lovely readers actually brought this successful recipe to my attention; to be fair, this is a recipe based on PH's own, but I give him all the credit for the unique components of it. I believe that it was these unique techniques that set this recipe apart from recipe #1 and recipe #2:

1. The egg whites are measured by volume rather than by egg (1/2 C, instead of 4 eggs), giving it more accuracy.
2. The egg whites are warmed carefully in the microwave, and the mixing bowl warmed under warm running water, in order to keep the temperature of the egg whites high enough to boost their volumizing potential. Good instructions are also given about how to know when the whites are whipped enough.
3. Granulated sugar is NOT added to the whipping egg whites.
4. The piped cookies sit on the baking sheets for 15 minutes before going into the oven in order to form the sheen on the domes.
5. The oven is heated to 425 degrees, and then dropped to 350 upon placing the baking sheet in the oven by propping the oven door open with a wooden spoon (which may also help keep the humidity of the oven lower).

The ganache recipe is great, but makes twice as much as necessary to fill one recipe of these macarons, so you can halve it if you want to make the exact amount.

So, this recipe gets my vote as the best chocolate macaron recipe, both in outcomes and in thoroughness of instruction. I've made it twice now, to entirely consistent results (if only I hadn't been out of parchment paper the second time, that is - NEVER make these without parchment paper unless you want broken-top macarons!). Next time I will make sure to grind and sift the almond powder better in order to produce a finer texture, or perhaps grind blanched almonds rather than starting with Trader Joe's almond meal.

Now to find good recipes for other macaron flavors! I am scared to upset the dry ingredient balance by removing the cocoa powder...if only amazon.fr would e-mail me to say that PH's Macaron book is ready to ship to me!

Wednesday, April 15, 2009

Garlic-Infused Oil


Since I'm eating a lot of greens these days (in between the cupcakes and macarons), I've been working on different ways to cook them up, which often involves garlic. My garlic technique in the past has been of the press-and-sauté variety, but the lovely Food Network has brought me to this more subtle method: infusing oil with garlic flavor.

If one heats garlic too quickly, it is easy for it to become bitter, not to mention burned; infusing oil avoids the risk of bitterness and burning. The garlic flavor is less strong in this infusion method, making it appropriate for dishes that want just a hint of garlic: you simply heat a little olive or canola oil in a pan over medium heat, and throw a peeled garlic clove in the oil. I usually leave it for a while on one side, and then flip it over to the other side once it's browned a bit. And voilà, garlic-flavored oil! Should make the greens a little more interesting!

Tuesday, April 14, 2009

Lemon White Chocolate Cupcakes


A few weeks ago, I made 36 cupcakes for an event, only to have a mere 6 cupcakes consumed at the event. Needless to say, I ended up eating more of these Lemon White Chocolate affairs than necessary, since boxes of cupcakes on the counter are difficult to avoid (darn you, clear plastic containers!).

The whole thing made me doubt my decorating choice, as an unknowing guest at the event said to me, "What's the deal with that cupcake icing?" I told her crisply that I had made the cupcakes, and thought it would be fun to squirt the frosting on them like funnel cakes. I don't think I'll continue to be in touch with that particular fellow guest.

Even after this cut to my confidence, I can't deny that the cupcakes themselves taste fabulous. After forcing my relatives to eat the leftovers (one of whom was licking her plate), I received an order for these cupcakes for a non-profit fundraiser. Take that, guests who didn't eat my cupcakes! Your loss.

Really, these are very nice, and follow my preferred principle of doctoring boxed cake mixes. The result is very light, very moist cake, poignantly lemony, and ever so slightly white chocolaty. It makes a beautiful layer cake, or 24 cupcakes (which you may decorate any way you like!). You can even eliminate the white chocolate if you just want a lemon cake, or replace the cream cheese frosting with buttercream. Trader Joe's has fabulous lemon curd and decent white chocolate chips.

Lemon White Chocolate Cake

6 oz white chocolate chips
1 box white cake mix (use butter cake mix for a richer cake)
2/3 C water
1/3 C oil
3 large eggs
2 large egg whites
2 T fresh lemon juice
1 tsp lemon zest
1/2 C store-bought lemon curd (half of a 10 oz jar)

Grease and line 2 nine inch pans or line 24 cupcake molds. Preheat oven to 350 degrees.

Melt white chocolate in glass bowl in microwave for one minute on high. Stir with rubber scrapper until melted and smooth.

Place mix, water, oil, eggs, egg whites, lemon juice, and zest into large mixing bowl. Pour in slightly cooled white chocolate. Blend with electric mixer 1 minute . Scrape bowl and mix for 2 minutes at medium speed. Divide batter into the two pans or cupcake tins. Bake until golden brown and it springs back when lightly pressed with your finger, about 28-32 minutes. Cool on wire racks and then remove from pans to cool on racks until completely cool.

Spread lemon curd between layers or on top of each cupcake. Frost with buttercream frosting (add 1 T lemon juice and 1 tsp zest for more lemony flavor) or Lemony White Chocolate Cream Cheese Frosting.

Lemony White Chocolate Cream Cheese Frosting

6 oz white chocolate chips
8 oz cream cheese, room temperature
4 T (1/2 cube) butter, room temperature
1 T fresh lemon juice
1 tsp lemon zest
3 C powdered sugar, sifted

Melt white chocolate in microwave on High for 1 minute. Stir with rubber scraper until melted and smooth.

Beat cream cheese and butter until well combined using electric mixer on low for about 30 seconds. Add lemon juice and zest and melted chocolate, beat on low just until combined, about 30 seconds. Add powdered sugar and blend on low until incorporated. Increase speed to medium and beat until fluffy, 1 more minute.

Wednesday, April 8, 2009

Mascarpone-Iced Cupcakes


This is my first foray into the flavor of mascarpone cheese, and I must say that just thinking about it now causes me to crave it. It's like cream cheese, but not - I still don't have words to accurately describe the unique taste. It makes a cool, creamy, simple icing, though, which I now am determined to rotate into my buttercream-dominated frosting usage.

Here's how you make enough to frost 12 cupcakes: scoop 4 oz. mascarpone cheese (found at any grocery store in the cheese section) into a bowl, and stir in powdered sugar until it reaches the desired consistency (I used 2-3 C). Add food coloring if you like. That's it!

What's more, I discovered this icing with a cake recipe from scratch that's actually good, and not difficult. Here it is, from the "Showgirl Cupcake" entry on DL's blog, with a few conversions done for you:

Butter Cake Cupcakes:

4 oz. (125 g) butter, salted or unsalted, at room temperature
2/3 C (125 g) sugar
2 large eggs, at room temperature
3/4 C plus 2 T (125 g) flour
1 1/4 tsp. baking powder
heaping 1/4 tsp. salt
1/2 tsp. vanilla extract
3 T whole milk or cream

1. Preheat oven to 350F. Line a 12-cup muffin tin with paper cupcake liners.
2. Beat the butter with the sugar until smooth and creamy. Add eggs one at a time, beating well, then mix in the vanilla.
3. Sift together the flour, baking powder, and salt.
4. Gradually add in the dry ingredients, folding as you go.
5. Add milk. Beat well.
6. Pour mixture into cupcake papers. Bake 15-20 minutes, until a toothpick comes clean.
7. Frost with mascarpone icing when cool.


Tuesday, April 7, 2009

Macarons with FEET


Who knew that macarons could have GIGANTIC feet? I was so ecstatic that my first macarons had the little tiny feet that I never worried that the feet would be super-sized.

I remade the first recipe I had tried, from Desserts Magazine, since the only real problem the first time around was the fact that they stuck to the parchment paper. Again, this time they tasted good, but the distractingly large feet were visually just a tad, well, distracting. And they did tend to stick to the paper again...well anchored by their ginormous feet, right?

Here the lovelies are, sitting before baking to form the nice gloss on the outside. Before the alien feet crawled out from inside of the shell and took over.


Still not sure what to blame for the extra-footedness of this batch, but I'm working on it; probably should check to make sure this oven is the right temperature before the next batch...which will be from one of Pierre Hermé's wonderfully detailed recipes. Hope nobody messes with the egg whites I've got sitting on the kitchen counter!

Wednesday, April 1, 2009

Sugared Puffs


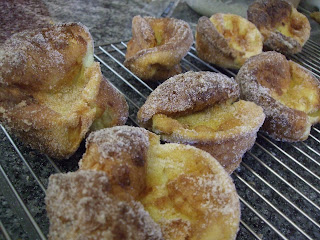
During my spring break baking frenzy, I made something much easier than the intimidating macarons while I was waiting for egg whites to come to room temperature: Sugared Puffs! A whimsical name for light and airy popovers crusted over with butter and cinnamon sugar - why not throw a few in the oven?

They were as magical to me as pitas, although a little slower to grant satisfaction: these take 35 minutes to puff up into fanciful edible balloons, while the pitas only take 3 minutes to swell.

The puffs deflated quickly when they came out of the oven, as they should, and then were brushed with melted butter and dredged through the cinnamon sugar, and voilà! Sugared Puffs. The nine popovers somehow only made it into 4 people's mouths, but trust me, everyone else was quite jealous.

Go ahead, give your food processor a spin, throw the batter in a well-buttered muffin tin, and eat them fresh out of the oven, coated in goodness. Great for celebrating spring. Or Passover (check it: these are only leavened by AIR!). Or Easter. Any excuse will do.