Tuesday, February 28, 2012

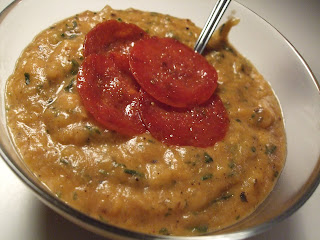
Potato Pizza Soup


This soup is the product of leftovers from a pizza-making night, plus leftover potatoes from Valentine's Day dinner and a few odds and ends in the kitchen. Pan-roasted potatoes (bake and then pan fry them in canola oil with seasoned salt and pepper) give this a full, toasty flavor (like pizza from a brick oven!); leftover steak fries from a restaurant could work, or leftover hash browns or breakfast potatoes.

I threw in a little spinach to add some green color, and heated up some pepperoni in a frying pan to add as a garnish. The jar of pizza sauce from Trader Joe's has great flavor by itself, so it spiced up the soup nicely. You could always make it spicier with red pepper flakes, or add some fresh basil to brighten it up. Whatever says pizza to you!

This is a dairy-free and wheat-free recipe, and meat-free if you skip the pepperoni.

Potato Pizza Soup

1 medium onion, diced
2 cloves garlic, minced
1/2 C frozen spinach, drained
2 C pan-fried, baked, or mashed potatoes
1/2 C pizza sauce
2 C coconut milk
garnish if desired

Sauté the diced onion in 1 T oil until the onion becomes translucent and starts to brown. Turn down the heat and add the garlic to cook for about 1 minute. Add the spinach and potatoes (I recommend browning the potatoes in a separate pan a little more before this to add more of a roasted flavor). When all the ingredients have heated through, add the pizza sauce and coconut milk, stirring to combine. Heat til boiling, stirring regularly. Once it boils, turn off the heat and remove the pan from the heat. Use an immersion blender or regular blender to purée the soup to the thickness you prefer (take care to not burn yourself if the soup is still hot when you are blending it). Garnish as desired.


Saturday, February 25, 2012

Roasted Pepper Corn Chowder


I'm realizing that all of my soup pictures look practically the same, but do not be deceived! They actually vary greatly from one another, and I'm especially excited about this one. Now that I've got down the necessary proportions for soup ingredients, I'm starting to feel like I can invent my own renditions of dishes. This one is a little spicy, a little smoky, and thickened by puréed onions, peppers, and corn.

This time I riffed off of this corn chowder on The Pioneer Woman's blog, adjusting for the content of my refrigerator/freezer and for my personal taste preferences. I increased the butter, added garlic, eliminated the bacon, substituted in different roasted peppers, added cumin and red pepper powder, but borrowed the idea of thickening it more with cornmeal.

If you keep a can of corn, a box of chicken broth, and some coconut milk in the cupboard, you could make this any time! Unsweetened coconut milk is becoming my cream/milk of preference for cooking, since before it's opened it's shelf stable (so I can just keep it around all the time, unlike dairy products), and after being opened lasts a while in the fridge. That also makes this a dairy-free recipe if you sub in oil for the butter. I've also started keeping a jar of roasted peppers in the fridge, since they are great in eggs, soup, vegetable dishes, and more (Trader Joe's has a nice jar of roasted red, orange, and yellow peppers). I imagine that it would work well with vegetable stock instead of chicken stock, if you want to go completely veggie.


Roasted Pepper Corn Chowder

3 T butter
1 onion, diced
2 cloves garlic, minced
3 pieces roasted red, orange, or yellow pepper, diced
8 oz. whole kernel corn (drained if canned)
1 tsp ground cumin
1/2 tsp red chili powder
4 C chicken broth
2 C coconut milk
3 T masa or cornmeal
1/4 C water

Sprinkle liberally with salt and pepper at each stage of the process.

Melt the butter until slightly browned in a dutch oven pot on the stovetop. Add the diced onion and cook over medium heat until translucent. When the onion starts to brown, turn down the heat a little and add the minced garlic, diced pepper, corn, cumin, and chili powder. Cook, stirring regularly, until the liquid in the mixture has evaporated and the elements become aromatic and a bit browned. Add the broth and coconut milk and heat until boiling, still stirring regularly. Mix the masa or cornmeal in a small bowl with the water, and once the pot is boiling stir in the masa/cornmeal. Turn down the heat, cover the pot, and let cook for 15 minutes. Remove from heat and use an immersion blender or regular blender to purée until it reaches the desired consistency. Season to taste with salt and pepper.

Serve topped with avocado, or corn chips, or green onions, or bacon, or just plain!

Friday, February 24, 2012

Cold-Brewed Iced Coffee


If you have ever been intimidated by the process of making coffee, but enjoy iced coffee, this recipe is for you. Heck, if you just like coffee, this recipe is for you. Nothing could be simpler to make, yet it produces a super smooth, not bitter flavor (what's the opposite of bitter? I'm blanking...I'll just go with smooth).

I got into this recipe when I was in Israel two summers ago, sweating profusely during my 9 am trek to class. I would put out the coffee and water mixture at night, and in the morning stir up some of the coffee concentrate with water, ice, soy milk, and sweetener, thereby mustering up the courage to venture into the 90+ degree morning.

I realize that we find ourselves in February now, but in Los Angeles that means nearly 80 degree weather some days, so some of us can give this a chance. Or bookmark it for a warmer time in other climates. Or drink it in your warm home and imagine you are in a warmer place. No excuses to not make it, see?

Don't forget that this makes a coffee CONCENTRATE - it will be strong if you don't water it down as the recipe indicates. I opted for the new Starbucks Blonde roast, which is the one coffee of theirs that I have ever wanted to buy a whole pound of...smooth is again the adjective I'd choose for this roast. Whatever coffee you use, expect to experience slightly different notes in it with this method.


(the numbers on the measuring cup are supposed to be backwards - to read from above the cup!)


Cold-Brewed Iced Coffee
taken from smittenkitchen

Mix 1/3 C medium-coarse ground coffee with 1 1/2 C water. Leave in a covered container at room temperature overnight (8-12 hours, longer doesn't hurt).

Strain through a coffee filter, fine mesh strainer, or cheese cloth. In a tall glass filled with ice cubes, mix equal parts water and coffee concentrate, adding milk and/or sweetener as desired.

SO EASY! Enjoy!


Wednesday, February 22, 2012

Date Crumble Bars


Unfortunately, I fed my dinner guests a bit too well the other night, and when we had finished baking four pizzas on my new pizza stone (which produces wonderfully crusty crust!), folks were too full to consume more than a few bites of these rich bars. Which meant that I ended up eating most of them myself...and enjoying every bit of them.

I had purchased some dates for an appetizer a while back, but they turned out to be too dry to be good on their own, so I stored them in the fridge in some brandy and vanilla extract for a while. Not only did this rehydrate them and impart flavor that made them a tasty snack, but it also made them a flavorful component for baked goods. I baked them into granola, bread, and these bars, and find myself wishing there were some left to eat. You can, however, use any dates for this recipe, since it calls for making them into a sugary syrup before baking them, so don't bother to obtain the most expensive dates out there (save those for eating!).

Many thanks to my great-uncle's wife for this recipe! It is buttery, chewy, and crumbly all at once, and oh so sweet. I imagine you could sub out the date syrup with any kind of jam; really this recipe is just a good base for crumble bars, and easy to make out of ingredients you would normally find in your kitchen.


Date Crumble Bars

Preheat the oven to 350 degrees.

Date syrup:
2 C dates, cut up
1/2 C brown sugar
1 C water
1 tsp flour

Cook until thick. Set aside to cool and add 1 tsp vanilla.

Dough:
Blend the dough with a pie crust blender or fork:
1C flour
1 tsp baking soda
2 C oatmeal (one minute)
1 C brown sugar
3/4 C melted butter

Press a little more than half of the dough mixture into the bottom of a 9" x 13" pan. Pour the date syrup over the layer of dough. Sprinkle the rest of the crust mixture on top. Bake 20 minutes.

Note: Half recipe fits 8" round pan


Tuesday, November 15, 2011

Chocolate Peanut Butter


I feel like I'm always showing up in the kitchen at odd times and announcing to my roommate that I'm going to make something incongruous with the moment of the day. This week, it was "sorry for all the noise while you do calculus, I'm making peanut butter."

This chocolate peanut butter recipe has been on my mind probably for the past year, and since I don't usually have peanuts around, it remained in the background. Until, that is, I made this cabbage and lime salad with roasted peanuts and had lots of peanuts left over.


The recipe really is as simple as can be - buzz up the ingredients in the food processor, and it's done! It's just a matter of having the proper ingredients around.


Even my little food processor-blender attachment could handle this recipe, so even if you don't have the most powerful processor in the world, you can manage this butter if you have some kind of food processor (not sure if a blender would work).


This is similar to Nutella in that it is a nut/legume spread with chocolate in it, but as my mom says, "it's better" because it doesn't have the hazelnuts. I'm inclined to agree...I do like some Nutella from time to time, but I always wish I didn't have to taste the hazelnuts while I'm eating it. Problem solved with this peanut spread.

It's actually a spreadable version of my mom's chocolate peanut butter bars; it's got nearly all the same elements - peanuts, powdered sugar, oil/butter, chocolate/cocoa powder - without the crunch of graham cracker crumbs, and less sweet. Plus it doesn't need to be cooked, and can be eaten with breakfast!


Chocolate Peanut Butter

2 C shelled and skinned peanuts
1/2 C GOOD unsweetened cocoa powder
1 1/4 C powdered sugar*
1/4 tsp salt, plus more to taste
3 T peanut or canola oil

Heat the oven to 400 degrees. Spread the peanuts evenly on a baking sheet; if they are raw, roast them for 10 minutes, and if not raw, roast for 5 minutes, shaking the pan to move them around about halfway through either time period.

Transfer the peanuts directly to the food processor and grind them for about 5 minutes. They will first become a chunky paste, then smoother, then liquify. Scrape down the sides as needed.

Add the cocoa, sugar, salt, and 2 T of the oil and continue to process until blended well (about 1 minute). Add more salt if needed, and last tablespoon of oil if it is thicker than desired.

Store in refrigerator in a covered container.

*If you, like me, happen to be out of powdered sugar when you make this, and attempt to make your own powdered sugar in the food processor first, be aware that if you do not process the granulated sugar enough, the result will be a grainy peanut butter. Still tasty, but grainy.