Tuesday, November 15, 2011

Chocolate Peanut Butter


I feel like I'm always showing up in the kitchen at odd times and announcing to my roommate that I'm going to make something incongruous with the moment of the day. This week, it was "sorry for all the noise while you do calculus, I'm making peanut butter."

This chocolate peanut butter recipe has been on my mind probably for the past year, and since I don't usually have peanuts around, it remained in the background. Until, that is, I made this cabbage and lime salad with roasted peanuts and had lots of peanuts left over.


The recipe really is as simple as can be - buzz up the ingredients in the food processor, and it's done! It's just a matter of having the proper ingredients around.


Even my little food processor-blender attachment could handle this recipe, so even if you don't have the most powerful processor in the world, you can manage this butter if you have some kind of food processor (not sure if a blender would work).


This is similar to Nutella in that it is a nut/legume spread with chocolate in it, but as my mom says, "it's better" because it doesn't have the hazelnuts. I'm inclined to agree...I do like some Nutella from time to time, but I always wish I didn't have to taste the hazelnuts while I'm eating it. Problem solved with this peanut spread.

It's actually a spreadable version of my mom's chocolate peanut butter bars; it's got nearly all the same elements - peanuts, powdered sugar, oil/butter, chocolate/cocoa powder - without the crunch of graham cracker crumbs, and less sweet. Plus it doesn't need to be cooked, and can be eaten with breakfast!


Chocolate Peanut Butter

2 C shelled and skinned peanuts
1/2 C GOOD unsweetened cocoa powder
1 1/4 C powdered sugar*
1/4 tsp salt, plus more to taste
3 T peanut or canola oil

Heat the oven to 400 degrees. Spread the peanuts evenly on a baking sheet; if they are raw, roast them for 10 minutes, and if not raw, roast for 5 minutes, shaking the pan to move them around about halfway through either time period.

Transfer the peanuts directly to the food processor and grind them for about 5 minutes. They will first become a chunky paste, then smoother, then liquify. Scrape down the sides as needed.

Add the cocoa, sugar, salt, and 2 T of the oil and continue to process until blended well (about 1 minute). Add more salt if needed, and last tablespoon of oil if it is thicker than desired.

Store in refrigerator in a covered container.

*If you, like me, happen to be out of powdered sugar when you make this, and attempt to make your own powdered sugar in the food processor first, be aware that if you do not process the granulated sugar enough, the result will be a grainy peanut butter. Still tasty, but grainy.




Saturday, November 12, 2011

Spiced Pear Upside-Down Cake


I love how this cake shines like the star that it is. It's a nice spin on the Tarte Tatin concept - caramel layer over fruit embedded in a buttery cake, baked upside down and flipped out of the pan onto a serving platter.

Add the fall spices and maple syrup, and the fact that it is an easily-executed success with good texture to the cake, and it's a winner in my book. I think apples could be substituted for the pears; I actually prefer this recipe to all the Tarte Tatins I've tried making thus far. While I continue my quest for a tasty but easy Tarte Tatin, this will work nicely.


Spiced Pear Upside Down Cake

12 T plus 5 T unsalted butter, plus more for greasing
2/3 C brown sugar
2 T maple syrup
2 ripe pears (Bartlett or Anjou preferred), peeled, halved, and cored
3/4 C plus 1 T granulated sugar
1 tsp ground cinnamon
1 tsp ground cardamom or nutmeg
1/4 tsp ground cloves
1 1/2 C flour
2 tsp baking powder
1 tsp salt
3/4 C milk
2 tsp vanilla
2 eggs


Preheat oven to 350 degrees. Butter a 9-inch round cake pan.

With a wooden spoon, vigorously beat the 5 T butter, brown sugar, and maple syrup in a mixing bowl until well blended. Spread the mixture over the bottom of the buttered cake pan.

Cut the pear halves into 1/4-inch slices and place in a bowl. Sprinkle with the 1 T granulated sugar, cinnamon, cardamom/nutmeg, and cloves and stir gently to coat. Arrange the pears in the bottom of the pan, fanning them and overlapping them slightly so the narrower ends point outward, and filling in the gaps with the smaller pieces (it never looks neat when I arrange fruit!).

Whisk together the flour, baking powder, and salt in a mixing bowl. Pour the milk and vanilla into a glass measuring cup.

In a stand mixer with the paddle attachment, beat the remaining 12 T butter and 3/4 C granulated sugar until fluffy. Beat in the eggs one at a time, scraping down the sides after each addition. With the speed on low, add the flour in 3 additions, adding half of the milk mixture between each flour addition. Increase the speed to medium-high and mix for 2 minutes.

Scrape the batter into the pan and spread evenly over the pears with a rubber spatula. Bake 60-70 minutes, until a toothpick comes out clean from the center.

Once finished baking, immediately loosen the sides of the cake from the pan with a butter knife. Place a large plate (at least 10 inches in diameter) upside down over the cake pan and carefully flip the cake out onto the plate, lifting the pan off the cake (shaking it if necessary to unstick it). Let cool for at least 30 minutes before serving.


Wednesday, November 9, 2011

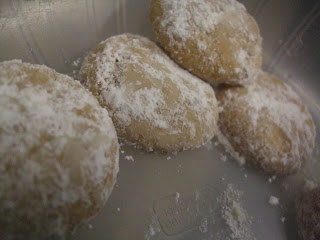
Lemon Snowdrops


It may sound odd, but sometimes I forget that other people eat carbs. Living in L.A., I have become accustomed to folks turning down my baked goods because they just don't eat sugar, wheat, or any sort of refined carbs - not that this stops me from baking what I like!

I made these cookies after exploring sophistimom's lovely blog, and took them to my class at UCLA to give as prizes for a bingo game we played to review for the midterm (I mean, even I can't eat carbs ALL the time). The undergrads GOBBLED them up. And the few that were left were devoured by other grad students. Hmm, on second thought, maybe this carb-eating phenomenon is more a feature of the starving student lifestyle than a typical characteristic of the surrounding population...in any case, I was glad these cookies were enjoyed.

Personally, I enjoyed the buttery, sharply lemony goodness immensely - even in the uncooked dough, since there are no eggs in it! If you like lemon, and chewy cookies, you are going to LOVE these simple goodies.


Chewy Lemon Snowdrops

1 3/4 C flour
pinch salt
8 T (1 stick) unsalted butter
zest of 2 lemons
2/3 C sugar
1/4 C agave nectar or honey
1 tsp baking soda
2 T lemon juice
about 1 C powdered sugar, for coating

Preheat oven to 325 degrees. Line a baking sheet with parchment paper.

Whisk together flour and salt in a mixing bowl, and set aside.

In an electric mixer with a paddle attachment, cream together butter, lemon zest, sugar, and agave/honey. Beat until very smooth, about 3 minutes, then scrape down the sides.

In a small cup or bowl, combine the lemon juice and baking soda. With the mixer on low, add the lemon juice mixture and flour mixture. Scrape down the sides of the bowl with a rubber scraper and stir by hand a few times to make sure everything is incorporated.

Roll the dough into balls about one inch in diameter. Bake for 10-15 minutes (less for chewier cookies). Let cool for a few minutes on baking sheets, then roll each cookie in a bowl of powdered sugar to coat before they finish cooling.


Brown Butter Ginger Chews


It seems like brown butter is featured in every recipe that catches my eye these days. I've always been a fan, but I think I'm still realizing just how many flavors can be complimented by the nutty flavor of brown butter. It is especially wonderful in fall recipes with apples, pears, or spices. In these soft and chewy ginger cookies, the butter unfolds another dimension to the flavors, giving it a subtle complexity - that je ne sais quoi. And with a bit of sea salt on top, yum!


This was also the perfect way for me to put to use my new melon-ball sized scoop, which greatly simplified the process of forming the cookies. I'm always put off by a recipe if it involves rolling each cookie individually by hand, but with the scoop it was much quicker to portion out equal amounts of dough. Since I didn't roll each ball carefully to make them perfectly identical, they had a rougher finished quality to them, but they did maintain their height because of the scoop shape - which left them chewy.


Brown Butter Ginger Chews

Don't forget to leave time for this dough to chill in the freezer!

5 C flour*
4 tsp baking soda
2 tsp ground cinnamon
1 1/2 T ground ginger
1 tsp ground cloves
1/2 tsp salt
1 C butter, room temperature
1/2 C brown butter
2 C brown sugar
2 eggs
1/2 C + 1 T molasses
1 C chopped crystallized ginger (optional, plenty spicy without)
coarse sea salt to sprinkle on top

Brown the 1/2 C butter and set aside (see here for instructions with photos).
In a large bowl, combine the flour(s), baking soda, cinnamon, ginger, cloves, and salt.
In a separate mixing bowl, beat the butters and brown sugar until fluffy (it's okay if the brown butter is still a bit warm).
Stir the eggs and molasses into the butter and sugar mixture.
Add the dry ingredients into the wet in two additions, mixing until combined. Fold in the crystallized ginger if desired.
Let the dough rest, covered tightly in plastic wrap, in the freezer for 20-30 minutes (I ended up leaving it there for more like an hour, not a problem).

Preheat the oven to 375 degrees.
Take the dough out of the freezer and form it into 1 1/2-inch balls.
Place on baking sheets about 2 inches apart, slightly flattening the bottom so they don't roll (not necessary if you're using the leveled scoops of dough).
Press a few flakes of coarse sea salt on each ball of dough.
Bake for 9-12 minutes until firm (less time for more chewy cookies).

Makes about 5 dozen!

I bet these would be great for ice cream sandwiches...with caramel or cinnamon ice cream? Or butter pecan?

*I used 2 C whole wheat flour and 3 C all-purpose flour.