Thursday, December 31, 2009

Los Olivos and Solvang

I have to admit, my enthusiasm for cooking has waned a bit of late. I know foodies aren't supposed to ever say this, but feeding myself is really a chore at times. I still enjoy the food that I eat, and want to have good food, but it's been difficult to muster the energy to put creativity and time into actually making it. I've been content to read the amazing cookbooks I recently acquired (one being Pierre Hermé's Macaron!!!) and am patiently waiting for my desire to cook to return.

Meanwhile, I've had some fabulous meals with friends and family over the holidays (which I myself did NOT cook), including a lovely lunch in Los Olivos with my grandmothers and mother. Los Olivos is a quaint little town, whose center is composed of a few blocks of Old West storefronts for cute wineshops and restaurants. The drive there on Hwy 154 is gorgeous, since it's right in the middle of the wine country featured in the film Sideways. Winter and early spring are always the best times to enjoy the scenery of the central coast of California, since the grass is green from the rains and the sun shines most of the time.


We lunched at the busiest café on Grand Avenue, and it was worth the 30 minute wait. Los Olivos Café and wine shop has a wall full of wine bottles, a fire place in the middle, another wall of local art, and patio dining in the front. The most difficult part of waiting for our food was watching the plates of gorgeous food being delivered to the tables, but it was our turn soon enough.

One of the best parts of the meal was the bread that arrived first: it was one of the most soft, flavorful, well-textured breads I've ever had at a restaurant. This is not the bread that you skip in order to save room for your entrée - this is the bread that you fill up on and hope they bring seconds.


For my entrée, I ordered a roasted butternut squash salad that had gorgonzola, roasted pepitas, cranberries, and a cinnamon balsamic over the baby greens. The squash was cold but sweet and spiced, and there was enough of it that I could only finish half - at least, once I had eaten a quarter of my mom's sirloin burger!


This burger was one of the many beautiful sandwiches we saw around the restaurant, and did not disappoint. The meat was excellent, and very rare, and the bun and sauces were great.


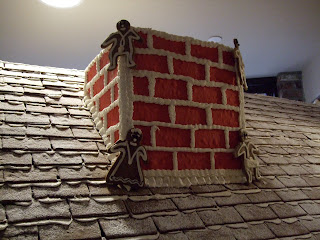
After lunch we continued to Solvang to visit the bakeries and catch sight of this human-size gingerbread house at the Chumash Casino-owned Corque Hotel. Although built on a wooden frame, this house is covered in real gingerbread. You can even smell it! The icicles are piped-on frosting, and icing coats the roof tiles like snow. The gingerbread house is made by Olsen's Danish Bakery in Solvang.


Solvang might be cheesy, but the bakeries are the best part in my opinion (surprised?), so a gigantic cookie house fits right in. It's worth a trip to the Central Coast to see these little towns!

Chocolate Peanut Butter Bars


Happy New Year, friends! I can't ring in the new year without paying homage to my mother's plethora of Christmas cookies with this long-time member of the gang: Chocolate Peanut Butter bars. Another quick and easy treat that's difficult to stop eating! The peanut butter makes this a little less sweet than other bars, and who can argue with the chocolate-PB combo?


Chocolate Peanut Butter Bars

18 oz. creamy peanut butter
3/4 C butter, room temperature
1 lb. graham cracker crumbs
1 lb. powdered sugar
2 C (12 oz.) chocolate chips

Cream the butter and peanut butter with a stand mixer (very difficult to do with a hand mixer or by hand once you add the dry ingredients in!).

Add the graham cracker crumbs and powdered sugar, mix in well. Press firmly into a 9"x13" pan.

Melt the chocolate chips in a microwavable bowl, stirring between 30-second bursts in the microwave. Be careful to not burn the chocolate; stir well each time and distribute the heat before deciding to microwave again. Should only take 2, maybe 3, turns in the microwave.

Pour the melted chocolate over the mixture pressed into the pan, and mark off the squares by running a knife through the chocolate layer. In the photos above, the squares are not cut all the way through yet - the chocolate was just marked off before it hardened. This makes it much easier to cut clean squares once the chocolate has solidified.

Refrigerate 3-4 hours or overnight, and cut squares when you're ready to serve them. You can make this well ahead of time, and it will keep for a few weeks.

Wednesday, December 30, 2009

Salted Browned Butter Crispy Treats


It's probably the time of the holidays where you're tired of baking but still have parties to attend, so these are your ideal potluck contributions: fast, inexpensive, and popular. I decided to make them because I had little time and lots of parties, and they disappeared like mad. Rice Krispie Treats might seem a little boring, but these have a secret weapon: browned butter.

The browning of the butter, and well, the doubling of it (!) plus a tad of coarse salt is the winning trick. This means a little bit of caramely-nutty-salty-chewy goodness in every bite, mmmmm.

Thanks to smittenkitchen for this and all her other consistently good recipes!

Salted Browned Butter Crispy Treats

Makes 16 2-inch squares or 32 1- x 2-inch small bars

4 ounces (1/4 pound or 1 stick) unsalted butter, plus extra for the pan
1 10-ounce bag marshmallows
Heaping 1/4 teaspoon coarse sea salt
6 cups Rice Krispies cereal (about half a 12-ounce box)

Butter (or coat with non-stick spray) an 8-inch square cake pan with 2-inch sides.

In a large pot, melt butter over medium-low heat. It will melt, then foam, then turn clear golden and finally start to turn brown and smell nutty. Stir frequently, scraping up any bits from the bottom as you do. Don’t take your eyes off the pot as while you may be impatient for it to start browning, the period between the time the butter begins to take on color and the point where it burns is often less than a minute.

As soon as the butter takes on a nutty color, turn the heat off and stir in the marshmallows. The residual heat from the melted butter should be enough to melt them, but if it is not, turn it back on low until the marshmallows are smooth.

Remove the pot from the stove and stir in the salt and cereal together. Quickly spread into prepared pan. A piece of waxed or parchment paper sprayed with oil works to press it firmly and evenly into the edges and corners, though a silicon spatula works as well.

Shower with sprinkles if you want some color, let cool, and cut into squares.


Sunday, November 8, 2009

Hazelnut White Chocolate Truffles


This is a recipe that I sort of ended up making by accident; I initially saw this list of candy recipes on Epicurious.com and wanted to make the Brown Sugar-Pecan Balls (still do!), but the truffle recipe was slightly simpler and fit better into the limited time that I had. The truffles started out as Coconut Macadamia Truffles, but I swapped in hazelnut for the macadamia due to the contents of my freezer, and brandy for the rum ('cause I've always got brandy around...), and suddenly the flavor was hijacked by the nuts and a hint of brandy bitterness.

These are great if you need a sweet treat that takes very little prep time, and can be made ahead - you just need to allow for the 4 hours setting time and time to roll them into balls prior to serving. Definitely a good holiday candy!


Hazelnut White Chocolate Truffles

8 oz. white chocolate chips
1 C (5 oz.) dry salted roasted hazelnuts
1/4 C heavy cream
2 T brandy (omit or reduce to 1 T if you aren't a fan)
1 1/2 C finely shredded unsweetened desiccated coconut

Finely grind white chocolate in a food processor and transfer to a bowl. Pulse nuts in food processor until finely ground (be careful not to grind to a paste).

Bring cream to a simmer in a medium skillet. Remove from heat and stir in brandy. Whisk in white chocolate until melted and ganache is smooth. Stir in nuts. Pour ganache into a plastic-wrap–lined 8-inch square baking pan and chill, uncovered, until firm, about 4 hours or overnight.

Invert ganache onto a work surface and remove plastic wrap. Cut ganache into 64 squares and roll each piece between your palms to form a ball. When all balls are formed, roll in coconut to cover completely, then chill truffles, covered, until ready to serve.

Saturday, November 7, 2009

Omelettes à la Julia


My time in France and Israel has convinced me that an omelette is a great meal for any time of day, even though most Americans limit it to breakfast. I've discovered that it is a convenient and quick way to get some protein and veggies into my diet, and tastes like a treat when I cook it up fresh. You may not think that an omelette is a quick meal, but if you see the way Julia Childs does it, you'll want to have one every day.

After viewing Julie and Julia I started youtubing some of her TV show clips, and this one really captured me. Okay, to be honest, immediately after viewing the movie I bought a baguette and Brie, but later on, I searched for videos of her and found this one of her making a flat French omelette. It made me realize one crucial point: I have always overcooked my eggs. If Julia can cook an omelette in 20 seconds, what am I doing just letting mine sit in the pan for minutes and minutes? Granted, I'm not quite sure how she makes hers happen if there are fillings involved, but I'm working on it.

Here's the process if you want a straight-up, simply-egg omelette; be sure to watch the video to get nice footage of the pan sliding/shaking part:

1. Heat up a 7 or 7.5 inch diameter nonstick pan REALLY hot. I put my pan over as high a heat as my stove can do. Julia adds a tablespoon of butter, I spray the pan with canola oil - but you need something to grease the pan to make this work.

2. Crack 2-3 eggs into a bowl and scramble them. If I want to cut calories, I use one whole egg plus two egg whites. You can add salt and pepper here, and a tablespoon of water if you like.


3. By the time the eggs are ready, the pan will be hot, so you pour the eggs into the pan and let them just sit for a few seconds.


4. Then you start swirling the pan around flat to get the eggs to wiggle and set. I try to shift the cooked egg on the bottom so that the liquid egg on top has a chance at sliding over to the hot pan surface. Gradually start jerking the pan towards you and let the egg start turning over on top of itself. I do this until all of the egg seems solid (but not rubbery), keeping the back-and-forth movement in order to prevent browning (unless you like the browning, but it makes it less tender). I still do this longer than Julia does because I'm not a fan of runny eggs, but it ends up tender.


5. Roll up the omelette, either by hand or by rolling the omelette out of the pan onto a plate, salt and pepper, and shave cheese over it if you like.


Sometimes I scramble the eggs in a Tupperware at night, so that in the morning I can throw the greased pan on the stove to heat up, grab the eggs out of the fridge, and just dump them in the pan. Fresh breakfast in less than a minute!


Tuesday, November 3, 2009

Monkey Cupcakes!


I know it's ridiculous, but I seriously can't move on with my life tonight until I post these photos. There's a monkey-themed baby shower tomorrow at work, so for weeks I've been scheming up how to get some cute monkey faces on the cupcakes without too much work (that is, less work than the fondant sculpting involved in this video).


I am so ecstatic that they turned out well with freehand piping; I found instructions on this website, and just went for it with cream cheese frosting on Mom's Carrot Cake (takes 20 minutes to bake the cupcake version). I am never able to execute piping with precision, but in this case that works out well - each face is different, in happy, quirky, childish ways.


Even the mud-colored icing I accidentally made (that kind of stuff always, always happens in cake decorating) came in hand for the eyes and mouths. I'm freezing the rest for the next monkeys...or whatever...that I make.


And here's one for my friend who had a bad day today: I'm going to save this guy for you to eat!


I had a brief moment of panic after making these when I thought "What if the mother thinks that I've tried to put baby faces on the cupcakes, but they just turned out ugly???" But then I remembered that it was the mother who chose the monkey theme...and I decided that I would make a "Monkey Cupcake" sign just to make sure all was understood.


Even if they would make pretty ugly babies, they are CUTE monkeys!


I hope you enjoyed this happy little album of crazy monkeys!

Sunday, November 1, 2009

Alfajores con dulce de leche


I just made these bad boys (from the beautiful blog flagrante delícia), and I have to say that I feel sorry for my roommate, whose gluten- and dairy-free life prevents her from indulging in the decadence of thick creamy caramel just barely contained by flaky shortbread. Add chocolate and coconut on top, and I've now consumed the amount of calories I burned in my 90 minute run today...thank goodness I ran!

I've always been hesitant to make caramel by boiling a closed can of sweetened condensed milk for hours, since I feel like I should be able to make real caramel (see Dave Leb's post on how to make it just right) from good ole sugar and cream. However, for dulce de leche I decided to give this method a try, and I see the merit: it produces a wholly different consistency and flavor than could be produced through scratch caramel creation, and the process couldn't be simpler. I would recommend making the caramel a day or two prior to making the cookies, since it takes so long to be done (3.5 hours) and needs to cool completely before you work with it.

A couple of pointers on the alfajores: the crumbly dough will need to be worked into a ball by hand, and then should be rolled out as thin as possible; if it is thicker than 3-4 mm, the cookies will take longer than 5 minutes to bake. To produce the tenderest cookies possible, you'll want to remove them from the oven before they're browned on top. You'll know that they're done when they've puffed a bit taller (as in the photos, you can see some layers on the side of each cookie) and when you poke at them they feel dry to the touch and slide on the parchment paper. They end up very delicate, so dipping in chocolate is difficult unless you have the right equipment. You can always drizzle with chocolate instead!

If you don't have a kitchen scale, I've converted the gram measurements into American volume measures in parenthesis.


Alfajores con dulce de leche

Makes 40 (20 pairs):

Dulce de leche

1 can sweetened condensed milk

Place the can totally immersed in water in a pan.
Bring to boil over high heat.
Reduce to low heat and keep boiling for 3 1/2 hours.
Add water as needed.
Open the can when completely cold (very important!).
You can also use a pressure cooker.

Alfajores:

112 g cornstarch (1 C)
125 g wheat flour (1 C)
1 egg
50 g butter, softened (~ 1/2 stick)
62 g icing sugar (1/2 C)
2 g baking powder (1/2 tsp)
1 tsp vanilla extract

Pre-heat the oven to 250ºC.
Line a baking sheet with parchment paper.
In the bowl of an electric mixer fitted with the paddle attachment, cream together butter and sugar on medium speed until light and fluffy.
Add the egg and the vanilla extract and continue mixing until well combined.
Add the sifted flour with the cornstarch and baking powder and mix until smooth.
Roll out the dough (3-4mm thick) over a floured worksurface.
Cut 5 cm diameter cookies.
Place the alfajores into the prepared baking sheet.
Bake for 4-5 minutes.
Transfer cookies to a wire rack until completely cool.

Spread the bottoms of half of the cookies with a generous layer of dulche de leche.
Sandwich together with remaining cookies.
Coat with chocolate or grated coconut.

Thursday, October 8, 2009

Chocolate Stout Cake, aka Baking with Guinness


What better way to include others than chocolate cake? Oktoberfest concluded this week, which means that you all will probably have some leftover beer sitting around...and even if not, why not make a cake loaded with stout (read: Guinness-like beer!), coffee, and dark chocolate? This is a nice dark cake, not too sweet, with a rich ganache icing - and I've been told it gets better over time (it didn't last long enough in my house for me to taste it on day 2). If you don't overwhip the egg whites like I did this last time, the cake should end up light and moist. The Guinness also lends a subtle yeastiness to the cake, a quality I appreciate when using it in this beer bread.


So here you go! Enjoy the remainder of the stout left in the can or bottle after you apportion some for the recipe:

Chocolate Stout Cake
from Bon Appétit (see original recipe for notes on beer)

3
ounces unsweetened chocolate, chopped
2 1/4
cups all purpose flour
2
teaspoons baking powder
1/2
teaspoon baking soda
1/2
teaspoon salt
14
tablespoons (1 3/4 sticks) salted butter, room temperature
1 1/4
cups plus 3 tablespoons sugar
3
large eggs, separated
3/4
cup chocolate stout, regular stout, or porter
2/3
cup freshly brewed strong coffee

Preheat the oven to 350 degrees. Butter and flour two 9-inch cake pans, line each with parchment paper on the bottom inside, and set aside.

Melt chopped chocolate in a double boiler and remove from heat.

In a medium mixing bowl, whisk together flour, baking powder, baking soda, and salt.

In a large bowl, use an electric mixer to beat butter and 1 1/4 C sugar together until light and fluffy (about 2 minute). Beat in egg yolks one at a time. Add melted chocolate, then stout, then coffee. Beat in flour mixture in two additions until just incorporated.

With clean dry beaters, whip egg whites and remaining 3 T sugar until stiff but not dry. Then fold 1/3 of whites into the cake batter, then the remaining whites in 2 additions.

Divide the batter into the prepared pans and smooth the top of each with a rubber scraper.

Bake about 30 minutes until a toothpick comes out clean. Let cool in pans on a rack for 20 minutes, then run a knife around the edge of each layer and turn out onto racks to cool completely.

Ganache Icing
1 pound bittersweet chocolate (54% to 60% cacao), chopped
2 cups heavy whipping cream
1 teaspoon instant espresso powder


Place chopped chocolate in medium heatproof bowl. Combine whipping cream and espresso powder in medium saucepan. Bring cream mixture to simmer over medium-high heat, whisking occasionally.

Pour cream mixture over chopped chocolate; let stand 1 minute, then whisk until chocolate is melted and mixture is smooth (try to whisk without incorporating air bubbles). Chill chocolate frosting until slightly thickened and spreadable, stirring occasionally, about 2 hours (or for quick chilling, place frosting in freezer until thickened and spreadable, stirring occasionally, about 30 minutes).

Using serrated knife, trim rounded tops from both cake layers so that tops are flat (optional). Place 1 cake layer, trimmed side up, on 9-inch-diameter tart pan bottom or cardboard round, then place on rack set over baking sheet. Drop 1 1/4 cups frosting by large spoonfuls over top of cake layer; spread frosting evenly to edges with offset spatula or butter knife. Top with second cake layer, trimmed side down. Spread remaining frosting evenly over top and sides of cake.

DO AHEAD Can be made up to 1 day ahead. Cover with cake dome and refrigerate. Let cake stand at room temperature at least 1 hour and up to 3 hours before serving.


Monday, October 5, 2009

Foodie: Exclusion or Embrace?

http://latimesblogs.latimes.com/.a/6a00d8341c630a53ef0120a6100d01970c-pi


If you click on this photo of celeb chef Rocco DiSpirito, you'll find an interesting article about his pitch at the recent BlogHer food blogger conference: he was representing Bertolli frozen foods. Rocco's presentation received quite mixed reviews amongst the audience, some of whom on principle rebelled against the idea of frozen pasta, and others who found it to be a satisfactorily convenient option for their lifestyles. The tension between these different responses brings to my mind some observations I've been making this past year about the foodie community, and I'd love to hear what others think.

For myself, I've been thinking a lot about what it means to be a foodie; I've always disliked the term because of the exclusive and often expensive taste it implies. I have to admit that it's hard not to judge other people on their food preferences the more time I spend trying different foods, but at the same time, I believe being a foodie should be about loving food.

As I meet more and more self-proclaimed foodies, I am realizing that loving food does not mean loving all kinds of food, having an objective standard by which to rate food, or knowing about all foods. Like anyone else, foodies usually have a few areas about which they know a lot, because that is what they love most, and as a result they spend a lot of time thinking about that food, trying related restaurants and stores, and making it in their own kitchen (hence all the baking posts on this blog...). As in other parts of life, very few people know something about everything, and even fewer are experts in it all.

Foodie status also does not mean doing away with personal preferences; for example, I do not usually care for tomatoes (often too acidic for me, cooked or raw) or for slippery slimy food (sorry, raw fish is not appealing to me yet). I am more willing than I have ever previously been to try things that I have not typically liked, but these proclivities haven't disappeared yet, and will probably be around a while. I know I am not the only food blogger about whom this is true!

We all also have different levels of appreciation of different aspects of food; I have a high preference for aesthetically pleasing food (visually, texturally) since I view food as art - that is, a sensory expression (right? all senses are involved!). As a result, I almost never post on food of which I do not have a photo, and am very unhappy if I only have a mediocre photo of it, because that is the only sensory experience that you as the reader get from a blog post on food. But I know others rate visual aesthetics and creativity of presentation lower than I do, which means that I have had meals that I LOVED with folks who didn't really care for the same meal.

Knowing all this, I increasingly prefer to hear from people why they have the opinions about food that they do. Why do you think the restaurant/dish/cuisine in question is good? If the answer to this question is not given, I am far less likely to put stock in the evaluative statement. I am certainly guilty of making blanket statements at times, but I TRY to be good about qualifying what I say, at least with "I like" or "in my opinion," if not a "because," just so it's clear that I'm stating my preference and not what I think is an unquestionable objective judgment about whatever food item.

I'm not saying this just to complain, but just to say that I hope that food for you is about discovering what you love, enjoying it, and sharing that passion with others. Shouldn't food be about inclusion and not exclusion? There are plenty of other ways to judge and classify people in the rest of life.

Saturday, October 3, 2009

Summer Food Summary

Somehow it's October and I am realizing that all of September passed without a blog-peep from me! As always, silence on the blog does not mean that I haven't been cooking or eating, so here's a photo summary of some summer highlights...before fall leads into the holidays and it's next year already. Enjoy!


Caramelized White Chocolate has not fallen off my radar yet, and has now been featured in ganache form as macaron filling and ice cream topping. Slightly burned white chocolate is its close cousin (an incident which revealed that my new oven runs hot!) whose butterscotch flavor may still be suitable for a gingerbread, more to come on that...


And more vegan cupcakes, in mint chocolate and salted chocolate incarnations...


As well as fabulous paninis at Surfas, well toasted but not greasy, filled with avocado smear, pesto, and otherwise lovely ingredients. Tasted a very nice chocolate cannellé there too, which may or may not have been eaten prior to the panini.


Figured out my favorite way of presenting and coating marshmallows - cut out with cookie cutters (much cleaner look than cutting into squares), coated with granulated sugar. A pleasing light crunch on the outside of the light, barely chewy marshmallow. Still loving rose flavor, and tried it out combined with almond extract. These babies are all about texture, although I still get more insecure about serving these to people than anything else - I'm always afraid they will not live up to people's marshmallow expectations, and they'll think they're strange. Made a lot of these when my oven was down!


Tasty Persian lamb shanks with saffron and sour cherry rice (okay, so my dinner companion ordered this, but it was more photogenic and unique than what I ordered!).


Banana lumpia, fried in phyllo dough with caramel sauce at Gerry's Grill. If this is Filipino dessert, I need to try me some more Filipino desserts!


Discovered I can get full on Farmer's Market fruit samples...these peppers at SF's Ferry Building aren't fruit samples, but they are pretty.


And intense, creamy, thick hot chocolate at Bittersweet Cafe. What a way to welcome the fall.

Stay tuned for this year's Oktoberfest treat: Chocolate Stout Cake. Nothing is more natural than baking with Guinness!