Showing posts with label vegetarian. Show all posts

Tuesday, February 28, 2012

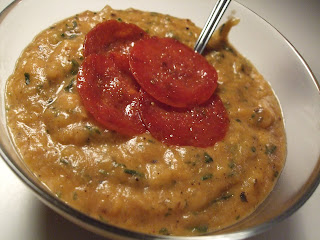
Potato Pizza Soup


This soup is the product of leftovers from a pizza-making night, plus leftover potatoes from Valentine's Day dinner and a few odds and ends in the kitchen. Pan-roasted potatoes (bake and then pan fry them in canola oil with seasoned salt and pepper) give this a full, toasty flavor (like pizza from a brick oven!); leftover steak fries from a restaurant could work, or leftover hash browns or breakfast potatoes.

I threw in a little spinach to add some green color, and heated up some pepperoni in a frying pan to add as a garnish. The jar of pizza sauce from Trader Joe's has great flavor by itself, so it spiced up the soup nicely. You could always make it spicier with red pepper flakes, or add some fresh basil to brighten it up. Whatever says pizza to you!

This is a dairy-free and wheat-free recipe, and meat-free if you skip the pepperoni.

Potato Pizza Soup

1 medium onion, diced
2 cloves garlic, minced
1/2 C frozen spinach, drained
2 C pan-fried, baked, or mashed potatoes
1/2 C pizza sauce
2 C coconut milk
garnish if desired

Sauté the diced onion in 1 T oil until the onion becomes translucent and starts to brown. Turn down the heat and add the garlic to cook for about 1 minute. Add the spinach and potatoes (I recommend browning the potatoes in a separate pan a little more before this to add more of a roasted flavor). When all the ingredients have heated through, add the pizza sauce and coconut milk, stirring to combine. Heat til boiling, stirring regularly. Once it boils, turn off the heat and remove the pan from the heat. Use an immersion blender or regular blender to purée the soup to the thickness you prefer (take care to not burn yourself if the soup is still hot when you are blending it). Garnish as desired.


Saturday, February 25, 2012

Roasted Pepper Corn Chowder


I'm realizing that all of my soup pictures look practically the same, but do not be deceived! They actually vary greatly from one another, and I'm especially excited about this one. Now that I've got down the necessary proportions for soup ingredients, I'm starting to feel like I can invent my own renditions of dishes. This one is a little spicy, a little smoky, and thickened by puréed onions, peppers, and corn.

This time I riffed off of this corn chowder on The Pioneer Woman's blog, adjusting for the content of my refrigerator/freezer and for my personal taste preferences. I increased the butter, added garlic, eliminated the bacon, substituted in different roasted peppers, added cumin and red pepper powder, but borrowed the idea of thickening it more with cornmeal.

If you keep a can of corn, a box of chicken broth, and some coconut milk in the cupboard, you could make this any time! Unsweetened coconut milk is becoming my cream/milk of preference for cooking, since before it's opened it's shelf stable (so I can just keep it around all the time, unlike dairy products), and after being opened lasts a while in the fridge. That also makes this a dairy-free recipe if you sub in oil for the butter. I've also started keeping a jar of roasted peppers in the fridge, since they are great in eggs, soup, vegetable dishes, and more (Trader Joe's has a nice jar of roasted red, orange, and yellow peppers). I imagine that it would work well with vegetable stock instead of chicken stock, if you want to go completely veggie.


Roasted Pepper Corn Chowder

3 T butter
1 onion, diced
2 cloves garlic, minced
3 pieces roasted red, orange, or yellow pepper, diced
8 oz. whole kernel corn (drained if canned)
1 tsp ground cumin
1/2 tsp red chili powder
4 C chicken broth
2 C coconut milk
3 T masa or cornmeal
1/4 C water

Sprinkle liberally with salt and pepper at each stage of the process.

Melt the butter until slightly browned in a dutch oven pot on the stovetop. Add the diced onion and cook over medium heat until translucent. When the onion starts to brown, turn down the heat a little and add the minced garlic, diced pepper, corn, cumin, and chili powder. Cook, stirring regularly, until the liquid in the mixture has evaporated and the elements become aromatic and a bit browned. Add the broth and coconut milk and heat until boiling, still stirring regularly. Mix the masa or cornmeal in a small bowl with the water, and once the pot is boiling stir in the masa/cornmeal. Turn down the heat, cover the pot, and let cook for 15 minutes. Remove from heat and use an immersion blender or regular blender to purée until it reaches the desired consistency. Season to taste with salt and pepper.

Serve topped with avocado, or corn chips, or green onions, or bacon, or just plain!

Saturday, July 3, 2010

Spiced Pumpkin, Chickpea, & Quinoa Salad


My roommate's going to laugh when she sees this post: every day at home in L.A., she makes some sort of quinoa dish for herself. I, on the other hand, had never made quinoa before in my life, until I got here to Israel. It's not that I avoided making it before; I like it, but just don't usually have time to cook other than special baking projects when I'm at home. When I got here, however, I discovered large bags of red and white quinoa in the cupboard of my rented apartment, and found some extra time on my hands.

Since everyone always expounds upon the great health benefits of quinoa ("keen-wah" would be an accurate pronunciation), and I had some fresh root veggies on hand ready to roast, and Israel always impresses me with its salad selection, and I had the time, I decided to work up a salad loosely based on this smittenkitchen bulgur salad recipe.

I mixed some red and white quinoa together, and I cut up and tossed the veggies and chickpeas with hot pepper oil, salt, and pepper before roasting them. I do highly recommend roasting the veggies since it's so easy and brings out their natural sweetness - which is good for the spices I've added here. Next time I'd like to toast the quinoa as well. I'm not entirely confident that I could reproduce this exact dressing again, but I'd like to give you the tools to make your own version - if I can flavor something to taste, you can too! The general idea is to combine some kind of oil, acidic component, sweetness, and spices.


Here's the way to go about it - you can time it so that the quinoa's soaking and then cooking while you're prepping the veggies, and you'll have time to make the dressing while everything's roasting:

Quinoa preparation:
1 C quinoa (any combination of different quinoa colors is fine, red and white is pretty!)
1/2 tsp salt (optional but recommended)

In a cooking pot, soak the quinoa in 1 1/2 C water for 15 minutes. After it's done soaking, stir the water and grains around with your hand to stir up the part of the outer layer that's supposed to come loose - it will make the quinoa a little bitter if it remains on it. Pour off the top layer of soaking water with any loose outer layers, and then pour the rest into a fine sieve and drain well. Put the quinoa back into the cooking pot, add another 1 1/2 C water with the salt, and bring to a boil on the stove top. Once it's boiling, cover tightly with a lid and turn it down to simmer for 15 minutes. Then remove from heat and let sit covered for another 5 minutes. When you're ready to use it, fluff it with a fork.


Veggie preparation:
1 large can or 2 small cans of chickpeas
1 large onion
approximately 6x5x2" piece of pumpkin, or 1 large sweet potato or other root vegetable
1 large beet
olive oil
hot pepper oil/red pepper flakes/cayenne pepper
salt and pepper
  • Preheat the oven to 400 degrees F/200 degrees C.
  • Line two baking pans that have edges with foil.
  • Drain chickpeas and toss in a bowl with olive oil (or, if you have it, hot pepper oil; if you don't have it, you may add some red pepper flakes or a dash of cayenne pepper here), salt, and pepper - enough to just coat them. Spread in a single layer on one baking pan.
  • Cube up the onion and the pumpkin/sweet potato/root veggie of your choice into pieces that are 1/2" to 1" square. Toss with olive oil, salt, and pepper and spread on the other baking pan.
  • Rinse the whole beet and wrap the whole thing in foil. Scootch some of the other stuff over and place it on one of the baking pans.
  • Stick both pans in the oven, setting a timer for 30 minutes. Check after 30 minutes to see how things are doing - my chickpeas were browned by then, so I took them out. The pumpkin and onion took another 15 minutes (for a total of 45 in the oven), and then I left the beet for another 15. The root veggies should be easily pierced with a fork when they're done, and I like the onions to be browned a bit since a raw piece of onion is too strong for me. The finished beet should give when squeezed (I got impatient and took the beet out too early, so mine was a little crunchy). Remove the beet skin once the beet has cooled down a bit and then cube it up.


Dressing preparation
(amounts are all roughly estimated, so you will need to adjust to your taste):
1/8 C olive oil
3 T hot pepper oil (may be replaced with red pepper flakes or 1/2 tsp cayenne pepper)
3 T apple cider vinegar (may be replaced with any other vinegar or lemon juice)
1 tsp honey
1/2 tsp ground cinnamon
1/4 tsp ground cloves
1/4 tsp ground ginger
salt and pepper to taste (I added a lot more than I first thought was necessary!)

Whisk all the dressing ingredients together until smooth in a large bowl. As each vegetable finishes roasting, toss it with the dressing (chickpeas first, then onions and pumpkin, then beets). Toss together with the quinoa when all veggies are done.


I'm going to serve this on wilted spinach, but it can be eaten plain very well. The spiciness is one of my favorite parts of this dish, but I hope it's not too much for you. Really, this is a spiced salad in more than once sense - piquant with the hot peppers, but spiced with the cinnamon, cloves, ginger, salt, and pepper.

And I guess I should mention that this is a cheap and healthy dish that can be altered to use any grain, vegetables, and seasonings you desire? I found everything I needed in a kitchen whose contents were predetermined by a previous tenant, so I'd love to see what your kitchens might produce!
Enhanced by Zemanta

Friday, July 31, 2009

Vegan Red Velvet Cupcakes


Now that my baking mojo is back, I baked the coconut macaroons of my previous post on the same day as these red velvet cupcakes...and a couple batches of Parisian macarons a couple days later, along with chocolate-coated fleur de sel and caramelized white chocolate ganache. Hm, it's been a busy week. Better be careful not to burn out my inner baker again!

So, red velvet. I better choose my words carefully on this topic...I will say that red velvet has always been an enigma to me. What is the cake supposed to taste like? Is it chocolate or not? Why are so many people passionately in love with it?

After trying these cupcakes, I think I have an inkling of an answer to these questions.

I have also always wondered how vegan baking works. I've done my share of experimenting with fruit purée, egg-based egg substitute, and margarine in baking, but was convinced that vegan baking still needed to be further developed...until these cupcakes.

You may think I'm overstating my case here, but try making these cupcakes: they are better than most scratch cake recipes that I've tried making, hands down. Not only that, but they are slightly healthier, and you can serve them to anyone!

Moist, well-textured, not too sweet, and just chocolatey enough (I may have added extra cocoa powder to that end...). TRY IT! YOU WILL LIKE IT!

Much thanks to the Facebook friend who generously posted this recipe, sourced from the Mac & Cheese food blog.

I intend to use this recipe as a base for other cupcake flavors, so I'll be sure to post any successes I have.


Here we go:

Vegan Red Velvet Cupcakes
from Mac & Cheese

2 cups soy milk
2 teaspoons apple cider vinegar
2 ½ cups all-purpose flour
2 cups sugar
4 tablespoons cocoa powder
1 teaspoon baking powder
1 teaspoon baking soda
1 teaspoon salt
2/3 cup vegetable oil
2 ounces liquid red food coloring OR several shakes of powdered red food coloring
4 teaspoons vanilla extract

Preheat oven to 350°.
Add vinegar to soy milk, and set aside to curdle (so cool!).
Sift flour, sugar, cocoa powder, baking powder, baking soda, and salt in a large bowl.
Add vegetable oil, food coloring, and vanilla extract to the curdled soy milk, and mix.
Pour liquid ingredients into the dry ingredients, and mix.
Fill cupcake liners ¾ full; makes about 22 cupcakes.
Bake for 20 minutes or until a toothpick comes clean.


Red velvet cake is normally paired with cream cheese frosting, so you can use my cream cheese frosting recipe or this similar, optionally vegan cream cheese frosting. To use the contents of my fridge, I substituted mascarpone in for the Tofutti, and it was really good. I could taste the margarine in the icing, but I still enjoyed the icing on the cupcake.

(Vegan) Cream Cheese Frosting:

½ C margarine, room temperature
½ C Tofutti Better Than Cream Cheese, room temperature, or mascarpone cheese
2 tsp vanilla extract
4 C powdered sugar

Cream margarine, cream cheese, and vanilla extract.
Slowly mix the confectioner’s sugar into the creamed sugar, and then beat until smooth and fluffy.
Frost cooled cupcakes. Pipe on with a medium round tip from a pastry bag to get the effect of these photos.


Now you're all set...but are you ready for the rave reviews?

Wednesday, June 10, 2009

A Knife makes a Moroccan Stew


So this brand new knife* gets unpackaged one night during June gloom and thinks, "This is the night to make that Moroccan stew I've been thinking about." He pulls the veggies out of the refrigerator drawers, mentally checking off the items that need to be taken care of. Slightly wilted swiss chard, barely fresh squash, lonely carrots that are scattered among the leaves. Skip the limp fava beans and oldish beets.

The rest of the ingredients are ready to go, so the knife takes the vegetables to task. Wilted stalks get thrown out, leaves are salvaged and chopped with a flare. He makes all the squash equal by cubing them evenly, after quickly lopping their heads and feet off. Peeled carrots are diced in a flash, and an onion prepped with a few sharp slices.

Now that the knife has made quick work of the normally burdensome veggie prep, the stew is basically made - spices coat the veggies, liquids hydrate the lentils, chickpeas fill out the final product. Et voilà, Moroccan stew! A satisfying day's work to inaugurate a knife's promising career.


Moroccan Vegetable Stew
Based on Surfas' Moroccan chili recipe

½ lb green lentils
2 cans garbanzo beans
8 C of water or chicken stock
1 C diced carrots
2 C shredded greens (chard, spinach, or kale will do)
1 C diced squash or zucchini
1 diced onion
1 can diced tomato
1 bunch chopped cilantro
1 T ground ginger
2 T ground cumin
1 tsp ground cinnamon
Salt and pepper as needed

if you can afford/access these specialty ingredients:
1 pinch saffron threads
½ C diced preserved lemons peel only

In a large soup pot sauté onions, carrots, and seasonings until translucent about 4 to 5 minutes. Add lentils, tomatoes, preserved lemon and chicken stock to cover. Let simmer until lentils are al dente about 20 minutes. Add garbanzo beans, greens, and squash and let simmer for 10 more minutes. Re-season if necessary.

Note: Sausage can be added if desired, and any of the vegetables can be replaced with other vegetables as you see fit. This makes a lot of food!

*a celebration of my lovely new knife - really, you would like it too!

Wednesday, April 29, 2009

Vegan Béchamel Sauce


I realize that my savory/meal posts are very inconsistently scattered between my baking posts, but that does not mean I am less committed to cooking for daily meals - I just tend to keep things sparsely healthy for those meals, so it's a little less interesting and less photogenic to post those items. Plus I really get excited about sugar and butter and all that good stuff!

Still, I was very enthused about this little, versatile item when it popped up on Chocolate and Zucchini, and ran out to buy some soy milk in order to whip up my own Swiss Chard gratin (pretty stalks of rainbow Swiss chard cooking in the photo above).

There are just so many reasons to make this sauce: it's quick and easy to make with ingredients you probably keep around the house, lower in fat than normal béchamel, vegan, creamy, and tasty enough to use as a base for many different dishes. If you're not vegan, add an egg to the sauce and you get an even richer healthy base for your dish. I didn't have the nutmeg, but it was still good.

I have also fallen in love with Gruyère cheese recently (how often do I say that about a food item?), especially when added to greens and whole wheat pasta, so I was pleased to see that this gratin was topped with the nutty mountain cheese. Okay, the recipe actually calls for Comté, but Gruyère was the much cheaper option at my store, and very good. It also makes use of bran (wheat bran, in my case) instead of bread crumbs as a crisp upper layer, another healthy substitution that won me over.

You should now be convinced that it's time to make a healthy, tasty meal! I've included a series of photos below which portray the changes in the sauce as the milk gets incorporated; sorry there's not better lighting over my stove!

Vegan Béchamel Sauce, from Chocolate and Zucchini

4 teaspoons vegetable oil
2 tablespoons flour
240 ml (1 cup) plain non-dairy milk, cold or at room temperature
salt, pepper, nutmeg

Heat the oil in a small saucepan over medium heat. Add the flour, stir it in quickly with a wooden spoon, and cook for 2-3 minutes, stirring continuously, without coloring (that's a roux blanc).

Remove from the heat, add a little of the milk, whisk it in to form a smooth mixture, then add the rest of the milk over medium heat, a little at a time, whisking well between each addition. Bring to a gentle simmer and cook for 5-7 minutes, stirring continuously, until thickened to a velvety consistency. Remove from the heat, season with salt, pepper, and nutmeg, and use while still warm.

Follow the photo series below if you are uncertain of how the sauce should look as you work the milk in.

Stirring the flour into the oil:


Adding the first bit of milk off the heat:


Next additions of milk:


Starts smoothing out:


Before cooking it the 5-7 minutes:


The velvety consistency, sauce sticking to the sides of the pan:


This is not a technical explanation, just a description of how it worked for me. Happy sauce making!

Monday, March 23, 2009

Vegan Sweet Potato Soup


Yeah, soup again. It may be spring officially, but things are still chilly enough in my part of the world that soup sounds good to me (the winter-spring divide in California is very fuzzy). I've made this soup twice in the last month for friends who have been in the hospital because it is a inexpensive meal that I feel like I can feed anyone. It has good flavor from the aromatics and dried herbs, but it is incredibly healthy - all vegetables, with a little bit of olive oil to draw out the onion and garlic. Unlike most soups, it doesn't require any broth/stock, so there is no chicken or beef stock to offend the vegetarian, and there's no vegetable broth to notch up the sodium content. To top it off, it's got a bright orange hue to liven up a cloudy March day. Time to pull out that immersion blender!


Vegan Sweet Potato Soup

From "A Simple Soup" on Chocolate and Zucchini

1 onion, diced
3 cloves garlic, minced
4 medium sweet potatoes, peeled and cubed
1 medium carrot, peeled and sliced
3 medium zucchinis, sliced
dried herb blend, like 21 Seasoning Salute from Trader Joe's (or fresh herbs if you've got some)
salt & pepper

1. Prepare vegetables according to ingredient list.
2. Heat a little olive oil in a large saucepan and cook the onion and garlic over medium heat until limp and translucent.
3. Add sweet potatoes, carrot, herbs, and salt and pepper.
4. Add water to just cover the vegetables (more water will make the soup thinner, less will make the end product thicker). Cover and bring to a boil. Cook covered for 15 minutes once it has reached a boil.
5. Add zucchini and cook for 5-10 minutes longer. Test vegetables with a fork or knife to determine level of tenderness (I prefer more firm zucchini, so 5 minutes is sufficient for me).
6. Taste and adjust seasoning.
7. Mash up the vegetables with a fork or potato masher, or blend with an immersion blender or in a food processor to desired consistency. It gets thicker the more you break up the sweet potatoes.


Make buttermilk biscuits (recipe to be posted later) to serve with the soup, and use the remaining sweet potatoes and buttermilk to make Sweet Potato Pound Cake with Buttermilk Glaze! Oh yeah, and the leftover zucchinis for Zucchini Pancakes. The possibilities are endless.

Saturday, March 14, 2009

Zucchini Pancakes


As I gravitate more and more towards a plant-based diet, I find myself remembering ways that my mom used to get vegetables into me as a kid. Zucchini was a much hated item in the kid-world of my family, and apart from its incarnations in zucchini bread and these zucchini pancakes, its appearance created quite a panic at the dinner table. I won't tell you what my brother used to do when forced to eat it - it wasn't pretty!

I have completely gotten over my dislike of plain zucchini, but I still enjoy these pancakes. They remind me a bit of onion and veggie cakes that I've had at Korean and Chinese restaurants, and are a great way to use extra courgettes (as anyone with a summer garden will certainly appreciate). You can probably even make them with ingredients you already have in your kitchen. Enjoy!

Zucchini Pancakes

1 1/2 C zucchini, grated (1-2 small zucchinis)
1/4 C white or whole wheat flour
2 T chopped onion
2 eggs
1/4 C Parmesan cheese
2 T plain nonfat yogurt OR mayonnaise
salt and pepper to taste

Mix all ingredients together and fry on an oiled frying pan or griddle, just as you would make normal pancakes. Make sure to spread the batter thin enough so that they won't take too long to cook (less than a 1/4 inch thick).

Makes six-5 inch pancakes.

Tuesday, February 24, 2009

Crustless Vegetable Quiche


I've been eating this quiche all week and still haven't gotten tired of it; I think it's become one of my favorite egg dishes that I've made thus far. I got the recipe off the back of a soy cheese package and adapted it to the contents of my fridge, resulting in a healthy breakfast dish with nice body and flavor. This is a quick mix-and-bake recipe that yields a lot of servings, so enjoy the simple preparation and plentiful outcome! Vegetarian-, lactose intolerant-, low-carb-, and high-protein-friendly.


Crustless Vegetable Quiche


12 eggs
3 C nonfat plain yogurt
12 oz. shredded soy cheese or lowfat cheddar/jack cheese mix
5 slices high-fiber sandwich bread, de-crusted and cubed (I like Orowheat Double Fiber)
1 onion, diced
3 C vegetables, prepared as for stir fry (I used several types of kale)
1 clove garlic, minced
1 T Italian seasoning mix (or any other seasoning mix you like)
sprinkling of red pepper flakes
salt and pepper to preference

Preheat the oven to 350 degrees. Grease a 9"x13" baking dish. Prepare the ingredients as listed. In a skillet on the stove top, pre-cook the onion and any tough vegetables (kale or other thick greens, etc. I would avoid broccoli in this vegetable mix, since it becomes overcooked and sulfuric quickly. Spinach, bell peppers, and mushrooms are examples of vegetables that do not need to be pre-cooked.).

Break all the eggs into a large mixing bowl and scramble them well. Stir in the yogurt, and then the remaining ingredients until thoroughly combined. Pour into baking dish and bake for 40-60 minutes. Dish is done when the center is set (not jiggly anymore) and top is starting to brown.

Experiment with different cheeses, vegetables, and seasoning (fresh herbs, anyone?) according to the season!

I've still got one more serving for my breakfast tomorrow...

Thursday, December 18, 2008

Swiss Chard Tart


Since I've made this tart four times in the last week, I feel like I need to share it with you all. I've made it so many times not just because it has a whole wheat crust, or because it's another way to get veggies on the table, or because it's a vegetarian entrée, or to use my new tart pan, but because it tastes so good! This tart is full of unexpected flavors and textures that bring something unique to any meal.

This recipe is based on Chocolate and Zucchini's Swiss Chard Pie, but I swapped out the pizza crust for the pâte brisée in the C&Z cookbook, which I made with whole wheat flour, and I used cottage cheese instead of costlier ricotta.

First, you make the pastry 30 minutes to one day ahead of time (it can be frozen for up to three days).

Pâte brisée
1 1/3 C King Arthur white whole wheat flour (white flour if desired)
1/2 tsp salt
8 oz chilled unsalted butter
1 large egg, lightly beaten
Ice cold water

In a mixing bowl, stir together the flour and salt, and then cut in the butter with a pastry cutter or a fork until the butter and flour together make a coarse texture (this may also be done in a food processor). Stir in the egg, and then mix in the water one teaspoon at a time until the pastry starts to come together and you can form a ball. Make it into a flattened ball, wrap in plastic wrap, and refrigerate for at least 30 minutes.

Remove the dough from the refrigerator 10 minutes before you plan to use it. After the 10 minutes, roll it out into a circle the size of your 10-inch tart pan (with removable bottom, if possible) on a floured pastry cloth. Lay the dough over your tart pan and press it lightly around the bottom edge. Use your hands to even the edges of the dough with the pan, removing any extra dough and smoothing out the edges. Now your dough is ready for the filling.

Preheat the oven to 425 degrees while you prepare the filling.

Chard filling
1 bunch Swiss chard
1 clove garlic, minced
1 handful raisins
1 handful pine nuts, toasted
1/2 C cottage cheese or ricotta cheese

Make a cup of tea and soak the raisins in the tea.

Prepare the Swiss chard by washing the leaves and stems. Separate the leaves from the stems and chop the stems to bite-size pieces. Gradually heat the clove of garlic in 1 tsp of olive oil in a saucepan, and then add the chard stems and cook them for a few minutes. Once they start to get translucent, add the chard leaves torn up into bite-sized pieces and cook for a few more minutes until wilted. Drain the cooked chard in a colander and then squeeze out excess moisture by placing cooked chard in a clean dish towel or doubled paper towel, twisting the towel around the chard, and squeezing out as must moisture as possible (if you skip this step, the tart will be watery).

Mix the drained chard with raisins, pine nuts, and cottage cheese/ricotta. Pour the mixture into the tart crust and spread evenly. Add more cheese if you'd like the tart to be more full.

Bake in the oven for 25 minutes and let cool before serving.

Monday, June 30, 2008

Monsieur Gorgonzola Salad


The other weekend at Julienne my lactose-intolerant self decided that she has a thing for Gorgonzola Cheese.  Despite my general hesitancies with blue-veined fromage, Monsieur Gorgonzola has proven attractive in diverse situations - primarily pear salad and open-face omelette, melted and crumbled - and his allure was too much to resist. I knew he was not good for me, but what could I do? I took the good with the bad (and the lactose pill with the cheese) and pursued the passion in my heart.

This affair resulted in a spur-of-the-moment trip to the store, where there was only a tub of crumbled, generic-brand Mr. G - but better than nothing. It turned out to be a bit dry, but the flavor was what I was looking for.  I was too tired to assemble an inspiring salad that night, but the chunks of Gorgonzola fit perfectly inside capped strawberries.  Definitely an appetizer waiting to happen!

A few nights later, however, the inspiration came, and the salad pictured above came to life: red leaf lettuce, mango, strawberries, blueberries, pecan bits, balsamic vinaigrette, and Mr. G.  This Monsieur Gorgonzola Salad is the less-sweet and more fresh counterpart to the Mistress Salad I had in Israel (not necessarily a statement about male v. female food characteristics); rather than caramelized dressing and pears, the dressing was tart and the fruits straight-up .  I ate it alone in my kitchen and actually made exclamations out loud while I ate it - "That is so good!", "oh my goodness!", "mmmmmm."  Profound observations, yes?


Monsieur Gorgonzola Salad

1 head red leaf lettuce
1 whole mango
4 large strawberries
1 small handful fresh blueberries
(substitute/add any fresh fruits in season or your faves)
light dusting of crumbled Gorgonzola cheese
light dusting of roasted unsalted pecan bits (TJ's has a great package of these)
Trader Joe's Fat-free Balsamic Vinaigrette

For one large salad as a one-person entrée, wash and tear up a plateful of lettuce (approximately 1/3 of the head).  Peel and slice the mango, wash and slice the strawberries, and arrange these with all the rest of the ingredients artfully on the lettuce.  Lightly dress the salad, and enjoy!

Sunday, June 22, 2008

From L.A.


Recently I've been coming to terms with the idea of being from L.A.; I moved here five years ago, and it looks like I'll be here another five, so at some point I will probably identify myself as "from L.A."  This identity change will take a while to get used to, but I've realized that there are a lot of great food opportunities here that I appreciate.  While some folks in other parts of the country, and even the state of California, do not have many food choices, I have options representing many ethnicities and cuisine trends.  I thought I would share a few photos of food I've eaten out just in the last week in L.A. - and by L.A. I mean everything in the L.A. Basin, from the coast on the west, north to the edge of Ventura County, south to the edge of the O.C., and east to Pomona.

The photo above is from a vegetarian restaurant in Eagle Rock called Fatty's; my friend ordered this lovely pear gorgonzola salad which made me quite jealous after the one bite I had.  The cheese was pan seared and breaded crispy on the outside but melty on the inside, the pears and oranges were sweet, and the vinaigrette light but tasty.  I love how the slice of blood orange sits on the cheese like a hat.


This is dessert at Babalu on Montana Street in Santa Monica - a trendy hangout that a friend introduced me to - a fabulous follow up to excellent entrées.  In the foreground you see the opera cake, made with thin layers of white cake filled in with cream and lots of almond chunks, coated in dark chocolate and served with thick, sweet whipped cream.  In the background you can see a bit of the Italian wedding cake, which is covered in cream cheese frosting and coconut on the outside, packed with walnut bits between the cake layers inside.


Back at Fatty's, this appetizer was a hit: whole dates, stuffed with walnuts and wrapped in veggie bacon, drizzled with a balsamic syrup.  Definitely something I'll try to replicate with turkey bacon - the smokey flavor of the pseudo-meat with the sweetness of the date was a marvelous combination, as was the crispiness of the bacon with the soft chewy date.


Not a great photo, but one of my childhood favorites: Beef Chow Fun.  As a kid I called it "fat noodles" (although these noodles aren't that fat), and it was one of the things alongside of sweet and sour pork that I would gobble up at the time at Chinese restaurants.  Usually smokey flavored, greasy, and great.


My current dim sum favorite: Siu Mai, or shrimp and pork meatballs.  Certainly not kosher nor vegetarian, but so, so good.  The best are at NBC in Monterey Park, where I practically go into raptures while I eat their siu mai and exclaim after every bite "these are so good!"  I don't know how the juicy flavor is the way it is, but I will not ruin the experience by overanalyzing it.  NBC also has the best general dim sum offerings and squab lettuce wraps, among other things.  Monterey Park is the current living Chinatown of L.A., and the place of my birth.  If you go for Chinese food in L.A., you gotta go here sometime.


I felt I had to represent Malibu in some way; these are the hugest glasses of Diet Coke ever (another unhealthy vice of mine; there's something classic about picturing unhealthy diet vices in Malibu...) at Paradise Cove, a restaurant where you not only can see the beach and the waves, but you have your feet directly in the sand.  Very pleasant on the evening of one of the hottest days of the year.


Last and far from least, some crême brûlée french toast with fresh strawberry sauce at Julienne, a quaint French-ish café in San Marino.  The inside of the bread barely has a bread texture, as it probably has been soaked in egg and cream for a tremendously long time, and the top has a small layer of torch-burnt sugar.  This was not as sweet as I was expecting, and the bread was a bit eggier than I prefer, but this was a unique breakfast with excellent sauces.  I would order it again to work out the secret of the bread texture - but then again, there are so many other things I want to try on the menu, and so much to browse in the attached store...

1627 Colorado Blvd.
Eagle Rock, CA  90041
323.254.8804

Babalu
1002 Montana Ave.
Santa Monica, CA  90403
310.395.25000

NBC Seafood Restaurant, Inc.
404 S. Atlantic Blvd.
Monterey Park, CA  91754
626.282.2323

28128 Pacific Coast Highway
Malibu, CA  90265
310.457.2503

2649 Mission Street
San Marino, CA 91108
626.441.2290

Wednesday, June 11, 2008

Cranberry Pecan Broccoli Slaw


My time in Israel reminded me that salads can be a real treat to eat; at sit-down meals the first course was often 5-7 small bowls of a variety of salads, from mayonnaise-based salads to barely-dressed mixtures of fresh vegetables. There were grains, diced fruits, dried fruits, pastas, meats, shredded vegetables, or cubed vegetables tossed with fresh herbs, spices, vinegar, yogurt, or mayonnaise in any combination you could invent. I am constantly on a quest to discover foods that are interesting and tasty at the same time as healthy, so this experience was an inspiration towards experimenting with new salad combinations.

This also brought to mind one of the few recipes for which I can truthfully claim authorship - a broccoli slaw flavored with dried cranberries and pecan bits. I enjoy the bite of the vinegar and pepper with the sweetness of the fruit and vanilla yogurt (yogurt also being an important Middle Eastern ingredient), held together by the crunchy broccoli slaw that lends such great health benefits. I hope you find this easy salad to be a treat!

Cranberry Pecan Broccoli Slaw
1 package broccoli slaw (I like Trader Joe's Organic Broccoli Slaw)
low-fat, low-sugar vanilla yogurt (like Dannon's Light-n-Fit)
white vinegar (also substitute fruit-flavored vinegars)
2 T sugar or 2 packets Splenda
dried sweetened cranberries
pecan bits
dash of cayenne pepper (optional)

Dump the broccoli slaw into a bowl with stirring room and add yogurt until it looks well coated and creamy. Add vinegar to taste. Sprinkle sugar/Splenda over the salad and mix in; add more if it tastes too tart for you. Mix in cranberries and pecan bits in desired amount, and top with cayenne pepper.

For a less sweet and more natural version, replace the low-sugar yogurt with plain yogurt and eliminate the sugar/Splenda. If you're interested in adding more fresh vegetables, baby spinach and white or red shredded cabbage go well with this. It might also be interesting to add some smoky flavor with bits of turkey bacon...or perhaps fresh mint leaves...and some different nuts...hm, I'll have to make it again soon!