Thursday, February 18, 2010

Adaptable Icings: Buttercream and Mascarpone Frostings


I accidentally had a cupcake for lunch on Valentine's Day; it wasn't planned, it just was there in front of me at noon, and I thought "I can't just Not Eat that cupcake." So I ate it. Which reminded me that I made all of these cupcakes last weekend for a friend's birthday...
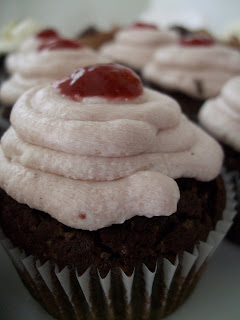


She had requested a variety of frostings - chocolate, cream cheese, and vanilla bean - so I decided go on a spurt of cupcake creativity. The kind of spurt where I make 6 different flavors, using a basic cake and frosting as a foundation. I honestly started out with about 10 flavors in mind, which I whittled down to 6, which finally became 5 in the absence of key ingredients and extra time.


This time I went with my favorite mascarpone chocolate cupcake recipe, minus the mixed-in chocolate chips. For one of the flavors I mixed in some spice, and for one I added some white chocolate chips, but the rest I left plain chocolate. And then came the icings:

Vanilla Bean Buttercream Frosting
This is really just a basic buttercream with a vanilla bean scraped in.


Cream together:
1 C (2 sticks) salted butter
1 tsp vanilla
the seeds of one vanilla bean scraped into the bowl

Add:
1 lb (about 4 C) powdered sugar
2 T milk or cream or soy milk


To make this into a chocolate buttercream, add:

1 T unsweetened cocoa powder
4 oz melted dark chocolate (bittersweet chocolate chips work fine)


To make this into a cinnamon chocolate icing (think Mexican chocolate, with cinnamon mixed into the batter as well!) add:

1 tsp ground cinnamon


Mascarpone White Chocolate Frosting
For the remaining cupcakes, I made a mascarpone icing, similar to cream cheese but a little less sour. Together with the chocolate cupcakes that had white chocolate chips mixed in, it had the effect of a chocolate cheesecake. I split off some of this frosting to also make a raspberry mascarpone icing, for which I filled the chocolate cupcakes with raspberry jam. To fill cupcakes, cut a cone out of the top of the cupcake, into the middle of the cake, and then lop off the tip of the cone, fill the space with jam, and replace the top of the cake.


Cream together:
1/4 C (1/2 stick) salted butter
1/4 C mascarpone cheese
1 tsp vanilla

Then add:
2 C powdered sugar
3 oz. melted white chocolate chips


To make this a raspberry mascarpone white chocolate icing (shall we just call this "raspberry" for short?), add:

several tablespoons of good raspberry jam (to taste)


When making these frostings, cream the butter/mascarpone and vanilla well together first, until it's getting fluffy, and then after slowly encorporating the powdered sugar and other additions, beat it long enough to make it light and smooth. You want it to make voluptuous cupcakes, n'est-ce pas?

It's always my feeling that food should be decorated to look like it tastes, so I encourage you to find creative ways of doing so - while it might seem too obvious to put white chocolate chips on top of white chocolate frosting, I like the way the textures and shapes look together. And hey, you know what you're eating when you pick it up.

Be forewarned that the amounts of icing produced by these recipes are not proportionate to one batch of 24 cupcakes; the vanilla bean buttercream is more than enough to frost 24, but the mascarpone icing is about enough for 12.

Bon appétit!

Tuesday, February 9, 2010

Homemade Anisette Liqueur and Simple Syrup


Did you know that liqueur can have simple syrup in it? I had no idea until this past week...but I suppose it makes sense that alcohol can be mixed with sugar. Simple syrup is a combination of water and granulated sugar that has been heated until it's, well, a simple syrup. This liquid sugar is useful for adding to beverages like homemade lemonade, mojitos, and more, because it has already dissolved the sugar, and the heating process has allowed there to be more sugar per liquid unit than there would be if you simply stirred granulated sugar straight into a cold drink. In Israel, I was served "liquid sugar" at times with iced coffee, with the same purpose of increasing the sweetness potential of my beverage. It can also be used to poach fruit, or to soak cakes that benefit from a little drizzle, and it can be flavored as desired.

When I discovered that the pine nut cake I had been dying to make required anisette liqueur, and that said liqueur was $15/bottle at the store when I finally made it to the store to buy it, I headed straight over to the spice aisle to look for anise oil or extract. I had found this recipe when I googled anisette liqueur, and it sounded easy and cheap since I already had a large bottle of vodka sitting around for my vanilla extract (alcohol consumption for me is much lower in priority than sugar consumption, not surprisingly, so it does not get drunk in my kitchen!).

I'm not advocating this as a substitute for good drinking liqueur, since I have only used it for baking flavor purposes, and I have a feeling that it is not exactly the same experience for someone who really appreciates anisette. It is, however, a much more affordable baking version, so keep this in mind as an option for your cooking projects.

Simple Syrup
The first step to anisette is making the simple syrup, for which you'll want to use a 2:1 sugar-to-water ratio. Take a small saucepan, and combine 2 C granulated sugar with 1 C water (use the same measuring cup to measure both the sugar and the water). Over a medium-low heat, stir the mixture occasionally as the sugar dissolves. Avoid bringing the syrup to a boil, but keep heating and stirring it until it becomes crystal clear (may be as much as 20-30 minutes). If it comes to a boil, remove it from the fire immediately. Boiling causes the syrup to form crystals more easily, so you may still use it, but it may not be as smooth in beverages as you would like. You can avoid boiling by using a double boiler. Store it in a clean, airtight container at room temperature, so that it may last 1-2 years. Do not let it get contaminated by touching it with your fingers, or it will spoil.


Once the simple syrup has cooled, it's time to make the anisette!

Homemade Anisette Liqueur

15.7 oz (466 ml) unflavored vodka
7 drops anise oil OR 1 tsp anise extract*
9.6 oz (284 ml) simple syrup
1 tsp glycerin (optional - I didn't use it)

Add the vodka to the bottle in which the anisette will be stored; add the anise oil or extract and shake vigorously until the oil is dissolved (1 minute) or the extract is well combined with the vodka. Add the rest of the ingredients and shake well.

Enjoy.


*anise oil is about 4 times stronger than anise extract - the amount of extract here is estimated. anise is a black licorice-like flavor, for those of you who are unfamiliar with it.

Pine Nut Cake


I feel like I need more recipes like this one: made in one bowl, using ingredients commonly found in the kitchen, requiring little to no baking technique, and pleasing any crowd with its moist, light sweetness. The pine nuts sprinkled on top add a little Mediterranean flare, but their flavor is not strong, and the sugar crusted over the top has been whetted down with anisette liqueur, so there's a teeny hint of anise in the crunchy sugar. The simplicity of preparation and flavor (with a little flare) make this cake the perfect last-minute treat for guests; it would go well with tea, or fruit, or after a heavy, strongly spiced meal.


This recipe has a sort of inverted genealogy; I got it from my maternal grandmother, since she really likes to make it, and I tried this cake first at her place. She, however, got the recipe from my mother (her daughter), who had learned it when she was doing her undergraduate degree in Nutritional Science.

I've been thinking recently about how much I rely on my mom for cooking advice; she's the one I call to verify if I need to throw out old dairy products, or to see if I can substitute one ingredient for another, or to determine how altering a preparation technique will change a recipe. I could probably figure out some of this on my own, but it is comforting to me to get an answer from someone whose experience I have absolute confidence in (and in the case of throwing food out, it assuages my guilt in wasting food that I haven't gotten around to using).

For this recipe, I called my mom to discuss the age of the cream in my refrigerator, since I was going to sub it in for the milk in the recipe. I ended up playing it safe and throwing it out, although sad that I had not checked the date on it when I bought it. I also emailed my grandmother to check and see if she really used the anisette liqueur it calls for, and got an emphatic "yes!" back. So you can thank three generations of my family for getting this recipe out to all of you!

The anisette liqueur is the one ingredient some of you may not already have on your shelves, but this cake is good enough to keep some around just in case you decide to make it. I was not willing to pay for the expensive anisette I found at the store, so I made my own from the vodka in my kitchen. Stay tuned for my next post on making anisette!


Pine Nut Cake

cake:
3 eggs
2 C sugar
1 scant C vegetable oil (slightly less than 1 C, just estimate visually)
1 C milk (lowfat is fine)
2 C flour
1 tsp baking powder

topping:
unsalted raw pine nuts (aka pinolas)
~1/4 C anisette liqueur

Preheat oven to 350 degrees. Prepare two 8-inch round cake pans by coating them with nonstick spray and flouring the pans.* In a mixing bowl, use an electric hand mixer to beat the eggs until they are well mixed and a little frothy. Add all the remaining cake ingredients and mix until just combined. Divide the batter evenly in the two pans and sprinkle pine nuts liberally on top of each.

Bake for 40 minutes, then remove from oven and generously sprinkle granulated sugar over the top of each cake. Wet the sugar on each cake with the anisette liqueur, making sure that all of the sugar has been whetted (I poured the liqueur into a teaspoon first to help me distribute the liquid evenly). Return to the oven for 5 more minutes, then cool the cakes in the pans for at least 5 minutes. Serve at room temperature.


*To flour a pan, spray with cooking spray, and then sprinkle several tablespoons of flour into the pan. Holding the pan over the sink or garbage can, tap the pan to spread the flour in a thin layer over the bottom and sides of the pan, letting the excess fall out. If you're concerned about the cake sticking to the bottom of the pan, cut out a piece of parchment paper the size of the bottom of the pan and put it in the pan before spraying and flouring it.