Monday, November 29, 2010

Cake Bonbons


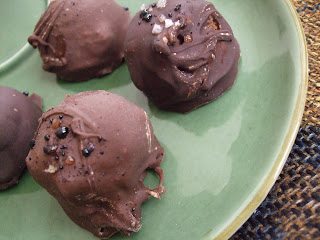
I have to admit, this recipe is supposed to be called "cake balls," but while being a bit giggle-inducing that name is also a little misleading: people expect to bite into the chocolate coating and find, well, a ball of cake, when in reality it is a ball of FROSTING and cake, which makes it moist, light, and buttery. You almost wouldn't guess there is cake inside, since it mostly tastes like a confection you would buy at a candy store.

In addition to being frightfully yummy, these goodies are also a fabulous back up plan when cakes don't turn out properly. If you make a cake, and it is too dry, crumbly, flat, dense, etc., you can just break it up into crumbs in a bowl, mix in some frosting, form balls, dip them in chocolate, and suddenly the failed cake is a delicious and presentable treat. Not a bad back up to have!

I ended up making these mocha cake bonbons because I made cupcakes that fell apart a bit when picked up; I had played around a little too much with the recipe, and the result tasted good but had the wrong texture. I even decided to make the cake balls after I had decorated the individual cupcakes - just threw them in a bowl and broke them up, evening the frosting throughout.


You've got three flavors to choose in a cake bonbon: the cake, the frosting, and the dipping chocolate. And hey, you can even top them with a decoration or flavor accentuations like I did here with instant coffee flakes and coarse sea salt.


Cake Bonbons
1 cake (the equivalent of one cake mix, which makes a 9"x13" pan, two 8" or 9" pans, or 24 cupcakes)
1 recipe buttercream or cream cheese frosting (see below for recipes)
2 12-oz packages of chocolate chips (I used one of milk and one of dark - why not?)

After the cake is baked and cooled, break it up into pieces in a large mixing bowl. Add the frosting, and mix in evenly throughout the cake crumbs. You want the texture to be relatively smooth, so you can form 1" diameter balls of the mixture that will stick together. If you've started with an already frosted cake (wedding cake leftovers, for example), just dump the frosted cake into a bowl and stir. Refrigerate or freeze the formed balls on parchment-lined baking sheets until they are firm, so that they won't fall apart when you dip them in the melted chocolate.

When the formed balls are ready, melt one bag of chocolate chips (I like to do this in a 2-cup Pyrex glass measuring cup so that there's some depth when you dip the balls in it). If you're doing the melting in the microwave, just heat it in 30 second intervals and stir well in between so that you do not burn the chocolate. Many prefer to melt chocolate in a double boiler, but I find the microwave simpler and sufficient.

Dip each ball in the chocolate, using a fork in each hand to pull the coated ball out of the chocolate while letting the excess drip off. Set on parchment to dry, and top with any decorations or flavor accentuations. Repeat with second bag of chocolate chips (I do one bag at a time, since the chocolate cools down as you're dipping the balls).


Buttercream Icing
1 C butter
1 t vanilla
1 lb. powdered sugar (approx. 4 C)
2 T milk
or cream (reduce for stiffer icing)

Cream the butter and vanilla with an electric mixer or stand mixer until well combined.
Add the powdered sugar gradually until smooth.
Add milk 1 T at a time; use less for stiffer icing.


Cream Cheese Frosting
1 cube butter, softened at room temperature
8 oz. cream cheese (do not use low-fat cream cheese)
1 tsp vanilla
1 lb. powdered sugar, sifted (about 4 C)

Cream together the butter and cream cheese with a hand mixer or stand mixer.
Add vanilla and, gradually, the powdered sugar.
Whip until light.


Sunday, November 28, 2010

Simple Italian Appetizers


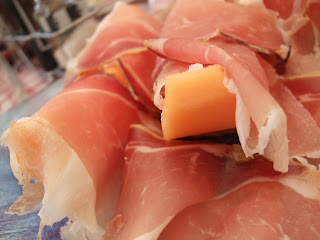
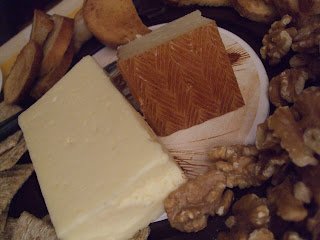
As the holiday entertaining season approaches, I can't get the fabulous food of Tuscany out of my mind. Something about the simplicity of the fresh ingredients has stuck with me - like the prosciutto and melon pictured above, and the sheep's cheese, walnut, and honey platter below.


I truly think that fresh, local ingredients are what make the food I experienced in Italy so excellent, but I think that we can translate these foods into our own local and affordable versions. These are the appetizers that I served to my family at one of our Thanksgiving meals this week, which added some variety to what we often serve at our gatherings. All are simple to prepare and serve.


Sheep's Cheese Platter

For the cheese platter, I chose a Manchego cheese over an Italian peccorino, since I have not yet found fresh peccorino I like here in California (mostly I have found Peccorino Romano, which here is usually a hard matured cheese rather than fresh). Since "peccorino" just means sheep's cheese, I found the Spanish Manchego to be a pleasing alternative sheep's cheese, which is readily available at Trader Joe's. Sheep's cheese is also a good option for the lactose intolerant in my family, since it has less lactose than cow's milk cheeses.

I also chose a Havarti (not a sheep's cheese, but very mild) at the request of one of my brothers, and both cheeses paired well with the California Premium walnuts, bits of 85% Columbian dark chocolate, creamed honey, and crackers I also obtained from Trader Joe's. I had prepared crostini by cutting a sourdough baguette in thin slices, brushing them with a mixture of half melted salted butter and half canola oil, lightly sprinkling them with fresh ground pink salt, and baking them at 350 degrees for 10-15 minutes until appropriately toasted. This is a great appetizer since people can experiment with the combinations they like of the available options.

Shopping List: Manchego cheese, Havarti cheese, California Premium walnuts, 85% Columbian dark chocolate, creamed or regular honey, crackers, baguette


Prosciutto and Melon

This is the prosciutto and cantaloupe I served; next time I would go with a different source for the prosciutto, since this one was a little too salty for me, and for some reason I had to wait 20 minutes at Muzio's in San Luis Obispo in 0rder for a quarter pound to be sliced for me. Still, it's a nice salty/sweet and fairly healthy appetizer; it takes about 1/4 pound of thinly sliced prosciutto to be served with half of a large cantaloupe. Just slice the melon and drape the prosciutto over it! I let the guests cut off their desired amounts of melon and ham.

Shopping List: 1/2 of a large cantaloupe, 1/4 lb thinly sliced prosciutto


Raspberry and Mascarpone Crostini

Finally, I stole this idea from a friend of mine in L.A.: crostini topped with mascarpone cheese (a milder cream cheese), fresh raspberries, and drizzled with honey. So simple, but so good! The crostini should be toasted plain at 350 degrees for 5-10 minutes, so that they are just dried on one side but not browned yet. These were sourdough, but a plain baguette would work just as well. Prepare just prior to serving so they don't get soggy, and the larger and plumper the raspberries the better.

Shopping List: 1 baguette, 8 oz mascarpone, 1 basket fresh raspberries, honey to drizzle

Thursday, November 25, 2010

Classic Pecan Pie


Post-Thanksgiving dinner, you may not even want to look at another pie, but my family celebration today reminded me of how excellent my mother's pecan pie recipe is. She originally got it from a 1974 Dear Abby column in the LA Times, and it has remained a family favorite ever since.

The filling has great flavor, but is simple to prepare. I've never been particularly good at pie crusts (since I've always been more motivated to perfect my cake methods), so I'm not going to pretend to instruct you on how to make one. Use any pie crust recipe you normally use, or just use a pre-made frozen shell - people will rave about the filling regardless.

There's still plenty of the holiday season for you to make this at least once! Enjoy, and Happy Thanksgiving!

Classic Pecan Pie

Preheat the oven to 350 degrees.

Prepare a 9" pie crust, either from scratch or frozen pre-made crust.

In a bowl, combine:

1 C white corn syrup
1 C dark brown sugar
1/3 t salt
1/3 C melted salted butter
1 t vanilla

Add:
3 eggs, slightly beaten

In the prepared pie shell, spread:
1 heaping cup shelled pecans

Pour the sugar, etc. mixture over the pecans in the pie shell. Bake for about 45 minutes until the filling is set (this will be after it has puffed up and then settled down again).


Tuesday, November 23, 2010

Theo Chocolate


For this holiday season, my gift to you is a trip to a chocolate factory - perhaps not as imaginative as Willy Wonka's, but far tastier as a REAL chocolate factory!

Theo Chocolate in Seattle is extraordinary both in the chocolate it produces and in the fact that it is one of the US's first fair trade AND organic providers.

For $6, they provide a sample-abundant, informative tour of the factory that details the complete chocolate making process, from the growth of the chocolate plant (theobroma, literally meaning "the food of the gods" - hence the name of the company) to the creation and packaging of the confections. Plus there are a lot of samples. Did I mention that there are samples of chocolate?

Theo partners with growers in Madagascar, Costa Rica, and the Dominican Republic to bring this excellent chocolate to us; I learned that 70% of the world's chocolate originates in Ghana and the Ivory Coast, but Theo does not import chocolate from these countries because they have not found a partner there who could qualify as fair trade (read: slavery and child labor). Interesting to know, I thought.

I also was fascinated by this stuff called mucilage that fills the cacao pods and surrounds the cacao beans; it looks like white mucus and is necessary for the fermentation process of the beans. After the pods are harvested from the trees (which may be done year-round, since the trees are in tropical environments), the mucilage and the beans within it are spread out in the open air so that the sugar in the mucilage can ferment - before chocolate was ever made, this was fermented to make alcoholic drinks. The fermented beans are then gathered and sent to the Theo factory in Seattle in burlap bags. The bags, in good green practice, are then sold or made into tote bags for purchase at the store.


Fermented cacao beans before processing

After the beans are received, they are checked for quality of fermentation - when opened, the insides should look cracked.


The machine pictured above hulls them, and then they get roasted, producing the cacao nibs that are all the rage in baking right now. The leftover shells are called chocolate mulch, which can actually be used as mulch (but not eaten). The nibs are not sweet, but a slightly bitter crunch of dark chocolate.


This machine then grinds up the nibs and heats them, so that they come out in the liquid paste that you can just see issuing from the funnel. From this point forward, the chocolate is shuttled from step to step in double-layer pipes, in which the outer pipe is filled with warm water to keep the chocolate in the inner pipe at the correct temperature to remain liquid. A little Charlie-and-the-Chocolate-Factory-esque, although the chocolate is not visible.


After running through machines that add the sugar content and aerate the chocolate (a step that removes the natural acidity of the chocolate), the chocolate ends up in these big vats.


Lucky people like this lady in the confection kitchen next to the factory room get to make caramels and other good things for the interior of the chocolates. All of these "inclusions" are made on site.


This dude works the inclusions into the chocolate, the bars get cooled, and then packaged up for all of us to eat!


Seriously, they let you taste EVERYTHING before purchasing it - and I'm not ashamed to say that I ate as many of the samples as I wanted, since I spent $50 in the store...


Ghost chili = hottest chili in existence. Yowsa!


The best news I can give you is that you can order Theo chocolate online, or use their Store Locator to find a provider near you. Yes, it costs more than most large chocolate distributors, but you will be paying for high quality flavor that is free of pesticides and fillers like soy lecithin...and for which we can reasonably hope that no person was oppressed.

Monday, November 22, 2010

Caramel-Draped Spiced Apples


I looooove caramel. Spoonfuls of caramel, all by themselves. I love it so much that caramel apples are usually a little disappointing - too much apple, too little caramel. And so darn hard to eat when you are eager to get that good stuff into your belly!

But I just discovered a way to provide more caramel with the apple, and make it easier to eat...and not unimportantly, to make this a dessert that you can plate for guests (at times that an apple on a stick is a little too informal).

Recent blog posts had me thinking about poaching fruit, since I had a great deal of mulled red wine sitting around, and the pears in this post looked especially appealing under their drapings of chocolate sauce. I also had some extra whipping cream in the fridge, but no chocolate in the kitchen, so when I stumbled upon this post for decadent-looking caramel-coated doughnuts, the caramel sauce recipe caught my eye right away. Apples in the fridge sealed the deal: I would poach the apples in the mulled wine, and coat them with thick caramel sauce.

I highly recommend mulling your own wine, since it is easy to just throw the ingredients into a pot and have the beverage on hand to enjoy - so full of comforting fall flavors! Once you've got a batch done, you can poach your fruit in it any time; if you don't have time to get some ready, follow the instructions on eHow.com for poaching fruit in wine that you add sugar and spices to just prior to poaching. I promise to post an orange-scented mulled wine recipe as soon as I have some photos to include, but meanwhile, you can still poach some fruit with the linked instructions - or buy the mulling mix at Trader Joe's for a quick solution.


Poaching the fruit:
~ 1 bottle mulled wine (red or white; you can use as little as half a bottle of wine and add water to make the liquid cover the fruit)
4 peeled apples (I used organic Gala, but any except for very soft apples will do)

Bring the wine (or wine and water combination) to a boil in a saucepan. Add the peeled fruit to the pan so that the liquid covers the fruit (add water until it's covered, if necessary), then place a small lid or a piece of parchment paper on the surface of the liquid to keep the fruit submerged. Simmer gently until fruit is soft enough to be easily pierced by a paring knife, but not mushy yet. Remove from pan with a slotted spoon. Cut out the cores prior to serving if desired.

Salted caramel sauce:
1 cup granulated sugar
3 tablespoons water
1 stick (115gr) salted butter at room temperature, cut into small pieces
1 cup heavy whipping cream

In a heavy saucepan set over low heat, combine the sugar and water. Cook just until the sugar is dissolved. Add the butter. Let it come to a boil and cook until it reaches a golden caramel color. Remove from the heat and add the cream ( it will splatter and get crazy). Whisk to combine and put back on the stove. Let it come to a boil again over low heat and cook 15-25 minutes until you reach a creamy consistency.
Let cool. Spoon liberally over poached fruit when ready to serve
.