Showing posts with label chocolate. Show all posts

Tuesday, November 15, 2011

Chocolate Peanut Butter


I feel like I'm always showing up in the kitchen at odd times and announcing to my roommate that I'm going to make something incongruous with the moment of the day. This week, it was "sorry for all the noise while you do calculus, I'm making peanut butter."

This chocolate peanut butter recipe has been on my mind probably for the past year, and since I don't usually have peanuts around, it remained in the background. Until, that is, I made this cabbage and lime salad with roasted peanuts and had lots of peanuts left over.


The recipe really is as simple as can be - buzz up the ingredients in the food processor, and it's done! It's just a matter of having the proper ingredients around.


Even my little food processor-blender attachment could handle this recipe, so even if you don't have the most powerful processor in the world, you can manage this butter if you have some kind of food processor (not sure if a blender would work).


This is similar to Nutella in that it is a nut/legume spread with chocolate in it, but as my mom says, "it's better" because it doesn't have the hazelnuts. I'm inclined to agree...I do like some Nutella from time to time, but I always wish I didn't have to taste the hazelnuts while I'm eating it. Problem solved with this peanut spread.

It's actually a spreadable version of my mom's chocolate peanut butter bars; it's got nearly all the same elements - peanuts, powdered sugar, oil/butter, chocolate/cocoa powder - without the crunch of graham cracker crumbs, and less sweet. Plus it doesn't need to be cooked, and can be eaten with breakfast!


Chocolate Peanut Butter

2 C shelled and skinned peanuts
1/2 C GOOD unsweetened cocoa powder
1 1/4 C powdered sugar*
1/4 tsp salt, plus more to taste
3 T peanut or canola oil

Heat the oven to 400 degrees. Spread the peanuts evenly on a baking sheet; if they are raw, roast them for 10 minutes, and if not raw, roast for 5 minutes, shaking the pan to move them around about halfway through either time period.

Transfer the peanuts directly to the food processor and grind them for about 5 minutes. They will first become a chunky paste, then smoother, then liquify. Scrape down the sides as needed.

Add the cocoa, sugar, salt, and 2 T of the oil and continue to process until blended well (about 1 minute). Add more salt if needed, and last tablespoon of oil if it is thicker than desired.

Store in refrigerator in a covered container.

*If you, like me, happen to be out of powdered sugar when you make this, and attempt to make your own powdered sugar in the food processor first, be aware that if you do not process the granulated sugar enough, the result will be a grainy peanut butter. Still tasty, but grainy.


Tuesday, May 24, 2011

Royal Wedding Cake: Chocolate Digestive Biscuit Cake


Yes. This is the Royal Wedding Cake that Prince William chose. The one that was not the fruitcake. The one that was not decorated in white icing. The one that is super easy to make, and as rich as a candy bar.

They say that British foodies were appalled at the low cuisine profile of this no-bake digestive biscuit cake, but it cannot be denied that everyone likes this dessert. I mean, who doesn't like candy bars? And I'm sure the royal bakers did not complain that at least one thing about this wedding was simple, even though they did dress it up elegantly (scroll all the way down this article to view the royal chocolate cake).

You can find digestive biscuits (McVitie's brand or otherwise) in the States easily enough; CostPlus World Market has a few brands, and I even found them at a local Persian market. I made the cake with plain biscuits, since the cake was so chocolaty I thought it would be good to add some non-chocolate crunch, but you may use the chocolate biscuits if you want to be completely true to Prince William. And no, they don't actually affect your digestion; don't be driven away by the unappealing name of these cookies, since they are not so different from graham crackers.

I decorated mine with some yummy Belgian chocolate caramel crisps and some more crumbled biscuits, but you could go without decoration, or create a riff of your own. Regardless, it will taste great, and serve a LOT of people; few people can eat more than a small sliver of the dense chocolate.


Royal Wedding Cake: Chocolate Digestive Biscuit Cake
Taken from seriouseats.com

800 g bittersweet chocolate (chips work)*
1 1/4 sticks unsalted butter, cut into 1 inch pieces
2/3 C corn syrup (or golden syrup, if you've got it)
275 g digestive biscuits

Prep:
Line a 9 or 10 inch springform pan with parchment paper on the bottom. You may make a tiered cake with one 4.5 inch and one 6 inch springform pan. This cake would be difficult to remove from a regular cake pan, and the sides come out shiny and smooth, so you don't want the parchment paper to creep up the sides. Break biscuits into bits 1/4 inch or so, as pictured below (for fun, use your bare hands on the biscuits!), and set aside in a large mixing bowl.


Heating:
In a double boiler, combine the corn syrup (or golden syrup) and butter, stirring until butter is melted. Add the chocolate and stir until all is melted.

Combine and mold:
Pour melted chocolate mixture over the biscuit bits and stir until well combined. Pour mixture into prepared pan and smooth the top with a spatula.

Let cake set in the refrigerator until the chocolate is hard and shiny, at least four hours. Unmold and cut with a sharp knife in very thin pieces when serving.


*Gram amounts can be estimated by the weight listed on the package you purchase if you don't have a kitchen scale. This is not a fussy recipe, so don't worry about being accurate to the gram.

Wednesday, March 16, 2011

Chocolate-Coconut Sherbet


And now back to the super easy ice cream recipes; this one happens to also be dairy-free with the possibility of a low-fat option. The cookbook description calls it something like Mounds in a cup - if you like coconut and chocolate, you'll like this!

After experimenting with a coconut-based vanilla rum ice cream (recipe still to be perfected), I've realized that great coconut flavor comes from coconut cream, so I might try to make a version of this with coconut cream to replace the coconut milk and sugar components. Meanwhile, I would recommend this as an easy recipe that is refreshing, but a little icy and very sweet. To be eaten in small amounts, or paired with a creamier, less-sweet ice cream like the caramelized white chocolate recipe I just posted.

Chocolate-Coconut Sherbet
from David Lebovitz' Ready for the Dessert

1 C water
1 C sugar
5 oz. bittersweet or semisweet chocolate, chopped
2 C canned Thai coconut milk (low-fat will make this icier)
1-2 T dark rum (dark rum has a more caramelly flavor than light)

In a medium saucepan, heat the water and sugar til boiling. Stir to dissolve. Whisk in the chocolate off the heat until completely melted. Stir in coconut milk and 1 T rum.

Pour the mixture into a blender and blend until smooth. Taste and add 1 T rum if desired.

Refrigerate until completely chilled, then freeze in ice cream machine according to the manufacturer's instructions.

Thursday, February 17, 2011

Carrot Chocolate Scones with Citrus Glaze


I made these spur-of-the-moment for a houseguest this week; after being assigned to a jury and being crazed with grading papers at the same time, I needed to decompress with a little baking. These scones came to mind when I realized that I had carrots in the fridge, and handling the sticky dough was just the thing for my tired mind.

Originally they were carrot coconut scones, but in the absence of shredded coconut in my kitchen, I replaced the coconut with chocolate chips, which worked out really well with the citrus glaze. You don't really taste the carrot in this, but it adds nice color to the scones. Carrot is sweeter than we realize, so it does work well in baked goods.


Carrot Chocolate Scones
taken from Carrot Coconut Scones in Baked Explorations

2 3/4 C flour
1/2 C sugar
1/2 C rolled oats
1 T baking powder
1/4 tsp salt
1 C chocolate chips (or shredded sweetened coconut)
1/2 C (1 stick) cold unsalted butter, cut into 1/2 inch chunks
1 large egg
3/4 C buttermilk*
1 T vanilla extract
1/4 C carrot purée**
1 egg white, beaten and set aside

Preheat the oven to 400 degrees F and position the rack in the center. Line a baking sheet with parchment paper.

In a large bowl, whisk together the flour, sugar, oats, baking powder, salt, and chocolate chips (or coconut).

Add the butter. Use your fingertips to rub the butter into the flour until the butter is pea size and the mixture is coarse.

In a separate bowl, whisk together the egg, buttermilk, vanilla and carrot purée. Slowly pour the wet ingredients into the dry ingredients and stir until the dough just comes together. Gently and briefly knead the dough with your hands. The dough will be sticky and may need to be sprinkled with flour.

Roll the dough up, turn it on its end, and gently flatten it into a disk about 1 3/4 inches high. Do not overwork the dough.

Whisk the egg white with 1 T water. Set aside.

Cut the dough into 6 or 8 wedges (6 will make them very large) and place the scones on the prepared baking sheet. Brush the tops with the egg white wash. Bake for 18 to 20 minutes, rotating the baking sheet halfway through, or until a toothpick inserted into the center of a scone comes out clean. Do not overbake.

Transfer the scones to a wire rack to cool completely. Place the baking sheet, with the parchment still on it, underneath the rack.

Citrus Glaze

1 T fresh lemon juice
2 T fresh orange juice***
1 C powdered sugar

Whisk all ingredients together in a medium bowl. The glaze should be loose enough to drizzle. If it is too thick, add a little more orange juice. If it is too loose, add a little more powdered sugar.

Drizzle the glaze over the cooled scones and allow it to set before serving.


*I never have buttermilk around, but it's easy to substitute milk curdled by apple cider vinegar; just add 1 T vinegar to 1 C milk and let it sit for a few minutes until you see some thickening/bubbling occur in the middle. In this case, I added 3/4 T vinegar to 3/4 C milk before I mixed the other ingredients, and by the time I needed the buttermilk, it was ready.
**I just buzzed up 2 carrots in the food processor, and that was more than enough, but the recipe recommends the following for the carrot purée: Place 1 medium carrot and 1/4 C orange juice in a microwaveable glass bowl, and cover tightly with plastic wrap. Microwave on high for 5 minutes, until carrot is fork-tender. Blend/purée until smooth.
***Since I had no oranges, I juiced one lemon and then added 1/4 tsp orange extract, and that was sufficient liquid and flavor for the 1 C of powdered sugar.

Thursday, February 10, 2011

Brown Sugar Pecan Shortbread


Lately I've been traveling a lot with cookies as well as mailing them to people, so that's got me thinking about hardy baked goods. These little guys seem to hold together well, and are a nice ice box cookie that can be made ahead of time and stay good for a while.

I have to admit that I have a hard time making ice box cookies look pretty (except these semolina dried fruit cookies, because the fruits are so colorful), so that's why I dipped these in chocolate - in spite of the extra work it takes to chocolate coat. I also needed something to affix the sea salt, and all together it was Tasty. The flavor reminds me of my mom's pecan balls, which are buttery and pecan-y.

Hm, these would be great served with ice cream or coffee...


Brown Sugar Pecan Shortbread

2 C flour
1/4 tsp salt
1 C unsalted butter, at room temperature
2/3 C light brown sugar
1/2 tsp vanilla extract
1 C pecans, toasted and coarsely chopped

In a small bowl, whisk together the flour and salt.

In a stand mixer fitted with the paddle attachment (or in a bowl by hand), beat together the butter and brown sugar on medium speed just until completely smooth and no streaks of butter remain. Mix in the vanilla. Add the flour mixture and beat until completely incorporated. Stir in the pecans.

Turn out the dough onto a sheet of plastic wrap and form it into a 4 1/2 by 6-inch (11 by 15 cm) rectangle about 1 inch thick. Wrap the dough tightly and refrigerate until chilled and firm, at least 1 hour and up to 4 days.

Position racks in the upper and lower thirds of the oven; preheat the oven to 350 F. Line 2 baking sheets with parchment paper or silicone baking mats.

Cut the rectangle of dough lengthwise into 2 equal pieces. Cut each half crosswise into rectangles 1/4 inch wide. Place the cookies 1 inch apart on the prepared baking sheets. Top with a few bits of sea salt if desired.

Bake, rotating the baking sheets midway trough baking, until the cookies are deep golden brown, about 15 minutes.

Let the cookies cool on the baking sheets until firm enough to handle, then use a spatula to transfer them to a wire rack.

Optional: Melt some chocolate and dip each cookie in it.


Monday, February 7, 2011

Chocolate Caramel Tart


This tart is not a fancy looker, but it is extravagantly rich and chocolatey. The short crust is not overly sweet, balancing the chocolate ganache* filling along with the salted caramel layer hidden underneath.

I would also characterize this dessert as simple and easy to prepare ahead of time - both good things in my book. You'll need to plan ahead to make of the three layers, since the crust, caramel, and chocolate ganache each need to set and cool before the subsequent layer can be added. There is more time necessary for cooling than for actual preparation. I've yet to master the art of making pie crust - and am unlikely to do so since I'm not super into pies - so a tart like this is an easy way of achieving something similar, but more to my taste.

I took it to an engagement party as the chocolate component of a trio of desserts (with a pistachio cake and a lemon parfait of cream and sponge cake, to be posted soon). In my opinion, providing sweets for an event involves trying to make as many people happy as possible, and that means knowing your audience and finding a variety that will appeal to them. For this event, I knew the attendees did not prefer overly sweet desserts, so I looked for less sweet options that were in different media (cake, tart, and creamy) and different taste profiles (nut, chocolate, and lemon). And to keep me happy, options that would be interesting but easy to make!

The tart crust may be used with a wide variety of fillings - glazed fresh berries, baked custard with fruits, nutty creams - you just want to bake the shell ahead of time and then add the filling, to be baked or served fresh.

Chocolate Caramel Tart

Short Pastry (Pâte Sablée)
  • 1/3 C plus sugar (unrefined or white)
  • 1 C plus 2 T flour
  • 7 T butter (salted, or unsalted plus a pinch of salt)
  • 1-2 T ice-cold water or milk

Preheat the oven to 350°F. Grease a 10-inch tart pan with butter and set aside.

Prepare the pâte sablée. In the bowl of a mixer or blender, combine the sugar and flour. Add the butter and process in short pulses until the mixture resembles coarse meal. (Alternatively, rub the butter into the dry ingredients by hand with the tips of your fingers or a wire pastry blender.) Add a tablespoon of water or milk and mix again, in short pulses, until it is absorbed. The dough should still be crumbly, but it should clump if you gently squeeze a handful in your hand. If it doesn't, add a little more water -- teaspoon by teaspoon -- and give the dough a few more pulses until it reaches the desired consistency.

Pour the mixture evenly into the prepared tart pan. Using the heels of your hands and your fingers, press on the dough gently to form a thin layer, covering the surface of the pan and creating a rim all around. Don't worry if the dough feels a little dry, this is normal. Cover with plastic wrap and refrigerate for 30 minutes, or up to one day.

Bake for 20-25 minutes, until golden, keeping an eye on it. Transfer to a rack to cool.

Salted Caramel Filling (optional)

  • 1/2 C light brown sugar
  • 1 T honey
  • 1/2 tsp fleur de sel or kosher salt
  • 1/3 C crème fraîche or heavy cream**
  • 2 T unsalted butter, diced

Once the tart crust is cooled, prepare the caramel filling. Make sure you have all the ingredients measured out before you start. Combine the brown sugar and 1 T water in a small heavy-bottomed saucepan and melt the sugar slowly over medium-low heat. Swish the pan around from time to time to ensure even melting, but don't stir. As soon as bubbles form on the surface (avoid overcooking the caramel, which would result in a bitter taste afterward), add the honey and stir to combine. Add the salt and cream and stir until blended. Remove from heat, add the butter, and stir to combine. Pour the caramel into the tart shell and tilt the pan slowly in a circular motion to coat the bottom of the shell evenly. Let set in the fridge for 40 minutes.

Chocolate Ganache Filling

  • 10 oz. good-quality bittersweet chocolate, finely chopped**
  • 1 C crème fraîche or heavy cream

Once the caramel is cooled, prepare the ganache filling. Put the chocolate in a medium mixing bowl, preferably stainless steel. Bring the cream to a simmer in a heavy-bottomed saucepan over medium-low heat (turn off the heat just after you've seen bubbles appear around the edge of the surface of the cream). Pour half of the cream on the chocolate (cover the rest), let stand for 20 seconds, and stir gently in the center with a whisk, gradually blending the cream with the chocolate until smooth. Add half of the remaining cream, and stir again until combined. Repeat with the remaining cream. Remove the tart pan from the fridge, pour the chocolate filling into the shell, and level the surface with a spatula, covering all of the caramel layer and spreading the ganache to the edges of the shell. Return to the fridge to set for an hour.

Remove the tart from the fridge 15 minutes before serving. Cut in small slices, and serve on its own or with fresh berries. The leftovers will keep for several days, tightly wrapped and refrigerated.


*Ganache is a smooth and creamy combination of chocolate and cream, similar to what you might find in the middle of a See's Candy chocolate. This recipe details one of several approaches to its preparation, but it is always a simple method.

**The price of butter and heavy cream at Smart and Final is regularly excellent, as is Costco if you have a membership. Trader Joe's is a slightly more expensive option, but still cheaper than most regular grocery stores.

***I like Trader Joe's Pound Plus for an affordable option, which is available in milk, bittersweet, and dark.

Tuesday, January 4, 2011

Mississippi Mud Pie


I actually spelled out M-I-SS-I-SS-I-PP-I in my head as I typed the title of this post. I love how some mnemonics stick with you for life - it gives me hope that I'll at least remember one word per language I study over the course of my life!

Unlike the language details that gradually slip away out of disuse, I know that I will remember this pie. It participated in a dear yearly ritual: ringing in the New Year with my own set of Woo Girls. As I've said to many of my friends, I have always found New Year's a disappointing holiday - until I started spending it with my Woo Girls. This was our third celebration together, and it just gets better every year. And this pie was...the icing on the cake? Or something like that. In any case, it was rich, good, and easy - just allow time for each layer to set, and you'll be enjoying the yumminess before you know it.

This recipe is from my Christmas gift to myself, Baked Explorations. Coming out of the NYC bakery Baked, it is full of rave-reviewed recipes that are new takes on classic American baked goods. The photos are gorgeous, the reinventions creative, and for once I want to make the entire pie/tart section of a cookbook - and I'm a cake girl!

A few notes:
  • Be aware that American desserts mean butter, cream, corn syrup, and even shortening sometimes.
  • I would use the unsalted butter as indicated; I did not, due to butter availability in the kitchen, and the dessert tasted salty to me. There is plenty of salt in the cookies to complement the sweetness of the filling.
  • Each layer of the pie needs time to set in the refrigerator or freezer, so make sure to build that waiting time into your plans. I've bolded the waiting time in the recipe below.
  • Let the finished pie sit in the freezer long enough for each layer to come to a consistent hardness; we were in a rush to eat the pie, so the ice cream was not as solid as the fudge layers, which I found harder to eat since it squashed out of the middle.

That being said, here's the first pie I tried from Baked Explorations (to be shortly followed by the first cake):
WOOOOOHOOOOOOO!

Mississippi Mud Pie (there I go again spelling it!)
from Baked Explorations

Chocolate Cookie Crust Ingredients:
30 chocolate wafer cookies, about 6 oz.
1 T granulated sugar
6 T (3/4 stick) unsalted butter, melted

Filling Ingredients:
4 oz. dark chocolate (60-72%)
1/4 C plus 1 T heavy cream
3 T unsalted butter
2 T light corn syrup
1 C confectioners' sugar, sifted
1 T Kentucky bourbon
1 pint good-quality coffee ice cream
1/2 C toasted pecans, coarsely chopped

Bourbon Fudge Topping Ingredients:
2 T heavy cream
2 T unsalted butter
1 T light corn syrup
3 oz. good-quality dark chocolate (60-72%)
1 tsp Kentucky bourbon

1. Chocolate Cookie Crust
Pulse the wafer cookies into fine crumbs with a food processor (if you don't have a food processor, place the cookies in a heavy duty ziplock bag and beat them with a rolling pin - but beware of holes in the bag!). Makes about 1 1/2 C. In a mixing bowl, stir together the crumbs and sugar.
Pour the melted butter over the crumbs and mix well. Transfer the crumb mixture into a 9-inch pie plate and press it into the bottom and up the sides. Use the back of a large spoon or the bottom of a measuring cup to get an even crust. Set the crust aside in the refrigerator.

2. Filling
Place the chopped chocolate in a large heatproof bowl.
In a medium saucepan, bring the cream, butter, and corn syrup to a simmer. Remove the mixture from the heat, pour it over the chocolate, and let sit for 1 minute. Then whisk the chocolate mixture until it is completely smooth. Whisk in the confectioners' sugar and bourbon.
Spread the fudge evenly over the bottom of the pie crust, cover it, and refrigerate for 2 hours.
Soften the coffee ice cream by placing the container in the microwave for 10 seconds on high. Put it into a large bowl and use a rubber spatula to beat it until it is slightly malleable. Spread the ice cream over the chilled fudge filling, sprinkle it with pecans, gently pressing them into the ice cream, and freeze the pie for about 1.5 hours, or until the ice cream is firm.

3. Bourbon Fudge Topping
In a small saucepan over low heat, heat the cream, butter, and corn syrup together until the mixture begins to simmer. Remove the pan from the heat and add the chocolate. Whisk until the fudge is smooth - if you still have a few stray chocolate chunks, reheat the mixture over very low heat until they are completely melted. Stir in the bourbon.
Beat the fudge topping until it reaches room temperature, and pour it over the ice cream and pecan layer in a zigzag pattern. Freeze the Mississippi Mud Pie until it is set, about 20 minutes. To serve the pie, cut it with a warmed sharp knife.

The pie will keep in the freezer, tightly covered, for up to 4 days.

Happy New Year indeed!

Monday, November 29, 2010

Cake Bonbons


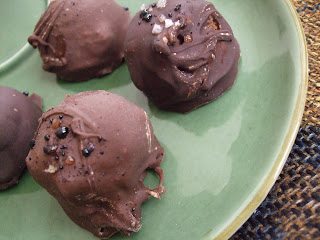
I have to admit, this recipe is supposed to be called "cake balls," but while being a bit giggle-inducing that name is also a little misleading: people expect to bite into the chocolate coating and find, well, a ball of cake, when in reality it is a ball of FROSTING and cake, which makes it moist, light, and buttery. You almost wouldn't guess there is cake inside, since it mostly tastes like a confection you would buy at a candy store.

In addition to being frightfully yummy, these goodies are also a fabulous back up plan when cakes don't turn out properly. If you make a cake, and it is too dry, crumbly, flat, dense, etc., you can just break it up into crumbs in a bowl, mix in some frosting, form balls, dip them in chocolate, and suddenly the failed cake is a delicious and presentable treat. Not a bad back up to have!

I ended up making these mocha cake bonbons because I made cupcakes that fell apart a bit when picked up; I had played around a little too much with the recipe, and the result tasted good but had the wrong texture. I even decided to make the cake balls after I had decorated the individual cupcakes - just threw them in a bowl and broke them up, evening the frosting throughout.


You've got three flavors to choose in a cake bonbon: the cake, the frosting, and the dipping chocolate. And hey, you can even top them with a decoration or flavor accentuations like I did here with instant coffee flakes and coarse sea salt.


Cake Bonbons
1 cake (the equivalent of one cake mix, which makes a 9"x13" pan, two 8" or 9" pans, or 24 cupcakes)
1 recipe buttercream or cream cheese frosting (see below for recipes)
2 12-oz packages of chocolate chips (I used one of milk and one of dark - why not?)

After the cake is baked and cooled, break it up into pieces in a large mixing bowl. Add the frosting, and mix in evenly throughout the cake crumbs. You want the texture to be relatively smooth, so you can form 1" diameter balls of the mixture that will stick together. If you've started with an already frosted cake (wedding cake leftovers, for example), just dump the frosted cake into a bowl and stir. Refrigerate or freeze the formed balls on parchment-lined baking sheets until they are firm, so that they won't fall apart when you dip them in the melted chocolate.

When the formed balls are ready, melt one bag of chocolate chips (I like to do this in a 2-cup Pyrex glass measuring cup so that there's some depth when you dip the balls in it). If you're doing the melting in the microwave, just heat it in 30 second intervals and stir well in between so that you do not burn the chocolate. Many prefer to melt chocolate in a double boiler, but I find the microwave simpler and sufficient.

Dip each ball in the chocolate, using a fork in each hand to pull the coated ball out of the chocolate while letting the excess drip off. Set on parchment to dry, and top with any decorations or flavor accentuations. Repeat with second bag of chocolate chips (I do one bag at a time, since the chocolate cools down as you're dipping the balls).


Buttercream Icing
1 C butter
1 t vanilla
1 lb. powdered sugar (approx. 4 C)
2 T milk
or cream (reduce for stiffer icing)

Cream the butter and vanilla with an electric mixer or stand mixer until well combined.
Add the powdered sugar gradually until smooth.
Add milk 1 T at a time; use less for stiffer icing.


Cream Cheese Frosting
1 cube butter, softened at room temperature
8 oz. cream cheese (do not use low-fat cream cheese)
1 tsp vanilla
1 lb. powdered sugar, sifted (about 4 C)

Cream together the butter and cream cheese with a hand mixer or stand mixer.
Add vanilla and, gradually, the powdered sugar.
Whip until light.


Sunday, November 28, 2010

Simple Italian Appetizers


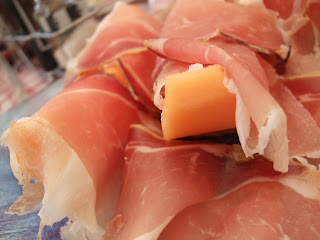
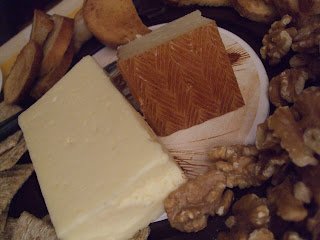
As the holiday entertaining season approaches, I can't get the fabulous food of Tuscany out of my mind. Something about the simplicity of the fresh ingredients has stuck with me - like the prosciutto and melon pictured above, and the sheep's cheese, walnut, and honey platter below.


I truly think that fresh, local ingredients are what make the food I experienced in Italy so excellent, but I think that we can translate these foods into our own local and affordable versions. These are the appetizers that I served to my family at one of our Thanksgiving meals this week, which added some variety to what we often serve at our gatherings. All are simple to prepare and serve.


Sheep's Cheese Platter

For the cheese platter, I chose a Manchego cheese over an Italian peccorino, since I have not yet found fresh peccorino I like here in California (mostly I have found Peccorino Romano, which here is usually a hard matured cheese rather than fresh). Since "peccorino" just means sheep's cheese, I found the Spanish Manchego to be a pleasing alternative sheep's cheese, which is readily available at Trader Joe's. Sheep's cheese is also a good option for the lactose intolerant in my family, since it has less lactose than cow's milk cheeses.

I also chose a Havarti (not a sheep's cheese, but very mild) at the request of one of my brothers, and both cheeses paired well with the California Premium walnuts, bits of 85% Columbian dark chocolate, creamed honey, and crackers I also obtained from Trader Joe's. I had prepared crostini by cutting a sourdough baguette in thin slices, brushing them with a mixture of half melted salted butter and half canola oil, lightly sprinkling them with fresh ground pink salt, and baking them at 350 degrees for 10-15 minutes until appropriately toasted. This is a great appetizer since people can experiment with the combinations they like of the available options.

Shopping List: Manchego cheese, Havarti cheese, California Premium walnuts, 85% Columbian dark chocolate, creamed or regular honey, crackers, baguette


Prosciutto and Melon

This is the prosciutto and cantaloupe I served; next time I would go with a different source for the prosciutto, since this one was a little too salty for me, and for some reason I had to wait 20 minutes at Muzio's in San Luis Obispo in 0rder for a quarter pound to be sliced for me. Still, it's a nice salty/sweet and fairly healthy appetizer; it takes about 1/4 pound of thinly sliced prosciutto to be served with half of a large cantaloupe. Just slice the melon and drape the prosciutto over it! I let the guests cut off their desired amounts of melon and ham.

Shopping List: 1/2 of a large cantaloupe, 1/4 lb thinly sliced prosciutto


Raspberry and Mascarpone Crostini

Finally, I stole this idea from a friend of mine in L.A.: crostini topped with mascarpone cheese (a milder cream cheese), fresh raspberries, and drizzled with honey. So simple, but so good! The crostini should be toasted plain at 350 degrees for 5-10 minutes, so that they are just dried on one side but not browned yet. These were sourdough, but a plain baguette would work just as well. Prepare just prior to serving so they don't get soggy, and the larger and plumper the raspberries the better.

Shopping List: 1 baguette, 8 oz mascarpone, 1 basket fresh raspberries, honey to drizzle

Tuesday, November 23, 2010

Theo Chocolate


For this holiday season, my gift to you is a trip to a chocolate factory - perhaps not as imaginative as Willy Wonka's, but far tastier as a REAL chocolate factory!

Theo Chocolate in Seattle is extraordinary both in the chocolate it produces and in the fact that it is one of the US's first fair trade AND organic providers.

For $6, they provide a sample-abundant, informative tour of the factory that details the complete chocolate making process, from the growth of the chocolate plant (theobroma, literally meaning "the food of the gods" - hence the name of the company) to the creation and packaging of the confections. Plus there are a lot of samples. Did I mention that there are samples of chocolate?

Theo partners with growers in Madagascar, Costa Rica, and the Dominican Republic to bring this excellent chocolate to us; I learned that 70% of the world's chocolate originates in Ghana and the Ivory Coast, but Theo does not import chocolate from these countries because they have not found a partner there who could qualify as fair trade (read: slavery and child labor). Interesting to know, I thought.

I also was fascinated by this stuff called mucilage that fills the cacao pods and surrounds the cacao beans; it looks like white mucus and is necessary for the fermentation process of the beans. After the pods are harvested from the trees (which may be done year-round, since the trees are in tropical environments), the mucilage and the beans within it are spread out in the open air so that the sugar in the mucilage can ferment - before chocolate was ever made, this was fermented to make alcoholic drinks. The fermented beans are then gathered and sent to the Theo factory in Seattle in burlap bags. The bags, in good green practice, are then sold or made into tote bags for purchase at the store.


Fermented cacao beans before processing

After the beans are received, they are checked for quality of fermentation - when opened, the insides should look cracked.


The machine pictured above hulls them, and then they get roasted, producing the cacao nibs that are all the rage in baking right now. The leftover shells are called chocolate mulch, which can actually be used as mulch (but not eaten). The nibs are not sweet, but a slightly bitter crunch of dark chocolate.


This machine then grinds up the nibs and heats them, so that they come out in the liquid paste that you can just see issuing from the funnel. From this point forward, the chocolate is shuttled from step to step in double-layer pipes, in which the outer pipe is filled with warm water to keep the chocolate in the inner pipe at the correct temperature to remain liquid. A little Charlie-and-the-Chocolate-Factory-esque, although the chocolate is not visible.


After running through machines that add the sugar content and aerate the chocolate (a step that removes the natural acidity of the chocolate), the chocolate ends up in these big vats.


Lucky people like this lady in the confection kitchen next to the factory room get to make caramels and other good things for the interior of the chocolates. All of these "inclusions" are made on site.


This dude works the inclusions into the chocolate, the bars get cooled, and then packaged up for all of us to eat!


Seriously, they let you taste EVERYTHING before purchasing it - and I'm not ashamed to say that I ate as many of the samples as I wanted, since I spent $50 in the store...


Ghost chili = hottest chili in existence. Yowsa!


The best news I can give you is that you can order Theo chocolate online, or use their Store Locator to find a provider near you. Yes, it costs more than most large chocolate distributors, but you will be paying for high quality flavor that is free of pesticides and fillers like soy lecithin...and for which we can reasonably hope that no person was oppressed.

Saturday, August 21, 2010

Beautiful Food in Paris


In the life of a student, luxury is something that normally comes in small doses, so I have come to be very appreciative of the luxurious pastries that pass through my life (=mouth). The parisian macaron is of course one of those extravagant moments that I love the most, and while a few dollars seems like a lot to spend for a few bites of bliss, it certainly can fit an economical budget from time to time.

Pierre Hermé, my favorite macaron provider in Paris, is closed for another four days for their summer revamp (not that I'm counting or anything), so meanwhile I have explored a few other options. The macarons above are found, well, at McCafé, and I believe are only 90 centimes. I tried the caramel au beurre salé, and it really wasn't bad! I have had much worse from patisseries in Paris, and it turns out that McCafé gets their macarons from the same provider that Ladurée does, albeit of a slightly lower quality (more on Ladurée later). Quite the affordable, speedy, and widely available option.


The McCafé at the Louvre food court


I also did a bit of research into cooking classes here; thanks to David Lebovitz and Clotilde Dusoulier's fabulous sites/books, I was introduced to the affordable Atelier des Chefs. Some of their lessons are as low as 15 Euros for a class that can be taken at lunchtime, which includes the food that you make so that you can eat it for lunch. They have many locations and different classes in Paris - and other cities in France - so you can choose one at a convenient place and with a menu that you find interesting. I chose a class for 36 Euros at the BHV store on the rue de Rivoli which featured financiers and caramel macarons. Predictable, perhaps, but given the opportunity to take a class on macarons in Paris, I had to take it!

In the end I learned some valuable techniques from the class, and will definitely use the pistachio-confit orange financier recipe (and will post it in English; click here for a demo video and the recipe in French). The final product of the macaron shells, however, was quite disappointing - they were crunchy, and not as smooth on the surface as I would have liked. So, I will take what I learned and supplement it with the other recipes and techniques I have read.


The Atelier des Chefs kitchen at BHV rue de Rivoli


I finally succeeded in making it to fine chocolatier Pierre Marcolini's store at a time when they weren't closed for their long daily lunch break - this is the third trip to Paris when I've tried to buy their chocolate-covered marshmallows/guimauves.


Pierre Marcolini rue de Seine boutique


Some of the best gourmet marshmallows I've had, and of course the chocolate was excellent! I love that the French for these is "Vanille enrobée de Chocolat" - as if the marshmallow is clothed in the chocolate.


Of course, other beautiful things popped out at me once I entered the PM shop, so I returned another day to buy these macarons, which were not quite delicate enough, but well flavored and very pretty.


Mojito and Limoncello Macarons


And this bouchée of nougat and chocolate cream topped with crisp cookie wafers had me intrigued, so I had to try it:


Mmmmmmmm....


I also made a stop at the nearby Patrick Roger shop, where I bought this caramel dome for a ridiculous 4 Euros, which I assume pays for the fact that it comes in its own box like a piece of jewelry (like I said, moments of luxury):


liquid caramel with a touch of citrus encased in chocolate


And my final moment de luxe this week was my first trip to Ladurée, the classic and classy tea shop that invented parisian macarons. As I have confirmed with my trial of their macarons and conversations with Parisians, these are good macarons, but not the best. The flavors were good, but the texture was lacking the magic of the Pierre Hermé macarons. Their shells were slightly too thick, and the filling in the middle not quite plentiful enough, so that the result was less delicate and less fondant in the middle. All the same, good, just not mind-blowing.


Ladurée to-go bakery at the Champs-Elysée location


I did very much enjoy the other pastries I got at Ladurée, which included a millefeuille praliné (praline napoleon) and an Ispahan macaron, which is actually a flavor creation of Pierre Hermé's: rose, raspberry, and lychee all together (which I had in croissant form back in June, amazing).


Ispahan and millefeuille praliné from Ladurée


But Paris on a daily basis for me has been typified by the wonderfully fresh foods that are all around the city in outdoor markets and even neighborhood supermarkets. My generous hosts even picked up pastries from a local shop for one breakfast:


And I have enjoyed this lunch on a number of days: whole grain cracker with goat cheese and fresh peach slices (see the caramel macarons in the background from my cooking class?). No complaints here! Gotta balance the rich pastries somehow.


Thank goodness for gorgeous weather to go running through the Parc des Buttes Chaumont!