Showing posts with label fruit. Show all posts

Friday, June 10, 2011

Whole Grain Blueberry Pecan Muffins with Ricotta Filling (Gluten-Free)


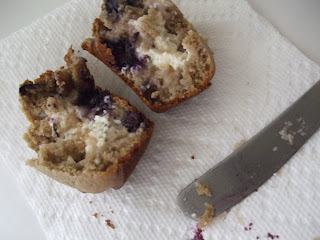
Here's the gluten-free muffins as promised - tender, moist, and flavorful. I am now a firm believer that gluten-free baking can work without gimmicks or difficult tricks, and be super tasty.

I relied on Gluten-Free Girl again to understand how to use the variety of gluten-free flours and starches that I've got in my cupboard. She's made gluten-free baking work without xanthan gum, or any other gum to provide binding in the baked goods, which is good news both for those who might be digestively sensitive to the gums or who would have a hard time finding them in the grocery stores.

Now that I've tried these, I fully believe what GFG says - gluten-free baking can produce lighter, better texture than gluten baking, because gluten can bind things up and weigh them down. That's why some recipes tell you not to over mix the batter - because the mixing action will create too much gluten and make a dense product.

You have a choice about the flours and starches you use in these muffins; GFG suggests keeping a supply of your own whole grain flour mix around, and provides a ratio of flour to starch (70/30) that you can use to create your own (I recommend reading her post linked above, it's much more thorough).

It is important to note that your baked goods will taste like the flours you choose; I was super curious about teff flour, so I mixed it with sweet sorghum and amaranth flours, with white rice flour as the starch and a few whole oats thrown in for texture. Teff turns out to have a fairly strong flavor (reminded me of a powdery buckwheat), so I would reduce the amount I would use of teff next time in proportion to the other flours, and probably choose another flour that does not have such a fine texture as the ones I chose. That being said, I still devoured four muffins as soon as they came out of the oven. Plus another one later - so, yeah, they turned out okay.

To make your own gluten-free flour mix, take 70% whole grain flours and mix with 30% starches.

Whole Grain Flours:
Almond
Amaranth
Brown Rice
Buckwheat
Corn
Millet
Oat
Quinoa
Sorghum
Sweet Brown Rice
Teff

Starches:
Arrowroot
Cornstarch
Potato Starch
Tapioca Flour
White Rice Flour


I also integrated a little advice from the Barefoot Contessa (incidentally, she is someone who I imagine never actually goes barefoot) who suggests greasing the tops of your muffin pans as well as the inside of the cups, to help you remove the muffins when they've cooled:


And I decided to make a ricotta filling for the muffins to use up some ricotta in the fridge, so I used the technique and amounts at this smittenkitchen recipe.

You can add any combination of nuts, dried or fresh fruits, or spices that you like - I went with frozen blueberries and pecans. The flavor of a lot of these flours is nutty, so the pecans were a good complement, and added nice texture.

It's possible to make the whole thing dairy-free too; just replace the buttermilk with almond or soy milk that you've curdled with 1 T apple cider vinegar, and eliminate the ricotta filling. GFG says that you can make them without eggs, but you'll have to see her instructions to see how to accomplish that.


Whole Grain Blueberry Pecan Muffins with Ricotta Filling
Gluten-Free

Preheat oven to 350 degrees. Grease a muffin pan or two (with filling, my batter made 17 muffins).

In a mixing bowl, whisk together to combine and aerate:

350 g whole-grain flour mix
1/2 tsp baking soda
1/4 tsp baking powder
180 g brown sugar
1 tsp kosher salt

In a separate bowl, whisk together:

2 eggs
1 1/4 C buttermilk*
1/3 C grapeseed oil

Use a rubber spatula to mix the wet ingredients into the dry. When they are almost fully combined, throw in any additions to you want (about a handful of chopped nuts and a handful of fruit will do; firm fruits may take longer to bake soft). Stir until all traces of flour are gone.

If you want the ricotta filling, combine:

1/2 C ricotta cheese (fat-free is fine)
6 T Greek yogurt or sour cream
pinch salt


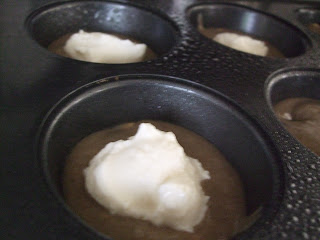
Fill each muffin well 1/3 full with batter, plop 1 T of ricotta filling on the batter, then cover with more batter until the well is 3/4 full. The muffins will rise, but not like crazy, so you don't have to worry if the wells are close to full.

Bake about 25-35 minutes, until muffins are browned, the tops spring back to touch, and a knife comes out clean.


*Buttermilk may always be replaced by regular or soy/almond milk that has been curdled with apple cider vinegar. The proportion is 1 T vinegar to 1 C milk; just dump the vinegar in the milk before you set up the rest of your ingredients and pans, and it will be ready when you need it.


*** I'd like to note that the best whole grain combination I've come up with so far was a mix of cornmeal and almond meal for the whole grain flours, and corn starch for the starch. Great texture and taste!

Monday, November 22, 2010

Caramel-Draped Spiced Apples


I looooove caramel. Spoonfuls of caramel, all by themselves. I love it so much that caramel apples are usually a little disappointing - too much apple, too little caramel. And so darn hard to eat when you are eager to get that good stuff into your belly!

But I just discovered a way to provide more caramel with the apple, and make it easier to eat...and not unimportantly, to make this a dessert that you can plate for guests (at times that an apple on a stick is a little too informal).

Recent blog posts had me thinking about poaching fruit, since I had a great deal of mulled red wine sitting around, and the pears in this post looked especially appealing under their drapings of chocolate sauce. I also had some extra whipping cream in the fridge, but no chocolate in the kitchen, so when I stumbled upon this post for decadent-looking caramel-coated doughnuts, the caramel sauce recipe caught my eye right away. Apples in the fridge sealed the deal: I would poach the apples in the mulled wine, and coat them with thick caramel sauce.

I highly recommend mulling your own wine, since it is easy to just throw the ingredients into a pot and have the beverage on hand to enjoy - so full of comforting fall flavors! Once you've got a batch done, you can poach your fruit in it any time; if you don't have time to get some ready, follow the instructions on eHow.com for poaching fruit in wine that you add sugar and spices to just prior to poaching. I promise to post an orange-scented mulled wine recipe as soon as I have some photos to include, but meanwhile, you can still poach some fruit with the linked instructions - or buy the mulling mix at Trader Joe's for a quick solution.


Poaching the fruit:
~ 1 bottle mulled wine (red or white; you can use as little as half a bottle of wine and add water to make the liquid cover the fruit)
4 peeled apples (I used organic Gala, but any except for very soft apples will do)

Bring the wine (or wine and water combination) to a boil in a saucepan. Add the peeled fruit to the pan so that the liquid covers the fruit (add water until it's covered, if necessary), then place a small lid or a piece of parchment paper on the surface of the liquid to keep the fruit submerged. Simmer gently until fruit is soft enough to be easily pierced by a paring knife, but not mushy yet. Remove from pan with a slotted spoon. Cut out the cores prior to serving if desired.

Salted caramel sauce:
1 cup granulated sugar
3 tablespoons water
1 stick (115gr) salted butter at room temperature, cut into small pieces
1 cup heavy whipping cream

In a heavy saucepan set over low heat, combine the sugar and water. Cook just until the sugar is dissolved. Add the butter. Let it come to a boil and cook until it reaches a golden caramel color. Remove from the heat and add the cream ( it will splatter and get crazy). Whisk to combine and put back on the stove. Let it come to a boil again over low heat and cook 15-25 minutes until you reach a creamy consistency.
Let cool. Spoon liberally over poached fruit when ready to serve
.


Saturday, August 21, 2010

Easy Fruit Crisp


This is a simple and excellent recipe that you will want to keep in your repertoire - as the original recipe says, you can make the crisp topping ahead of time and keep it in your freezer for a last-minute dessert option. Heck, you can even sugar the fruit of your choice and store it in your freezer too.

I love that this truly is a crisp topping, given the semolina (again replacing cornmeal) and ground nut composition that avoids getting soggy. I put the whole batch of topping over a relatively small pan of fruit, so the proportion of topping-to-fruit was just to my liking (read: lots of topping!). For those of you who are curious, this type of dish is called a "crumble" by the French. But if you call it that, you must say "crumble" with a good French accent, to be true to this amazing crumble recipe from real Frenchie Brigitte.

Pick any in-season fruit that bakes well; I chose nectarines, but I was really dying to try figs. I was uncertain of how figs bake up, since their texture is so unique, so I hesitated to make them for my class as this dish was intended. Guess the figs will have to wait. Hmm, maybe with pecans?


Easy Fruit Crisp

6 ripe nectarines, or equivalent volume of fruit of your choice
2 T granulated sugar

3/4 C (105 g) flour
2/3 C (90 g) semolina flour or cornmeal
3/4 C (80 g) almonds or walnuts
1/2 C (110 g) brown sugar
1 tsp ground cinnamon
pinch of salt
4 oz (1 stick, 115 g) unsalted butter, well chilled

Preheat the oven to 375 F.

Dice fruit, place in a bowl, and stir it together with the 2 T sugar. Let sit to permit the juices to start flowing (called "macerating" the fruit).

In a blender or food processor, pulse the flour, semolina, nuts, brown sugar, cinnamon, and salt until the nuts are in smaller pieces.

Cut the butter in chunks and add to the processor, pulsing until the butter is finely broken up, the mixture no longer looks sandy, and it's starting to stick and clump together.

Place the fruit in a 9 or 10-inch round baking dish, and spread the topping over it. Bake until the topping is browned and the fruit is bubbling underneath and can easily be pierced with a sharp knife. Baking time will vary from 30 minutes for softer fruit like nectarines to nearly twice as long for firmer fruits like apples, so check after 30 minutes and then continue to keep an eye on it if you're trying a fruit for the first time.

Serve alone, or with vanilla ice cream or whipped cream.

Friday, August 20, 2010

Mediterranean Semolina Cookies


I was really at a loss when deciding what to call these unique treats...they're based on zaletti, an Italian cornmeal cookie (see David Lebovitz's recipe here, which I used as a starting point), but I replaced and changed the proportions of the flours and sugars, and created a theme with the dried fruits, so they certainly aren't zaletti any more.

Despite appearances, they also aren't what you would typically think of as "cookies," nor do they fit the categories of "biscuit" or "crisp" or any other cookie-ish designation that I can think of...so they're just cookies in this post. What that means here, however, is that they are both a teeny bit chewy from being baked, and a little crunchy from the semolina flour. They aren't too sweet, but have the flavor interest added by the variety of dried fruits and the crisped brown sugar on the outer rim.

The Mediterranean theme comes from the combination of dried fruits I found at a little shop in the Old City of Jerusalem - dried figs, kiwi, coconut, mango, and pineapple. You certainly could create any fruit combination of your choice, so see what is available to you and go for it! I loved the colorful results of this particular mix, but I could see a really beautiful Christmas cookie coming out of dried cherries, cranberries, maybe candied green cherries?


A lot of what I made while in Israel was inspired by the contents of my cupboards - as an apartment that changed student hands frequently, still-fresh ingredients were left behind by previous tenants, and I resolved to use as much of them as possible. It would have been a pity to waste perfectly good (free) food! Such was the case with semolina, which I had never bought before, but the full bag of it convinced me that it was the perfect substitute for polenta recipes that I found. If you have polenta or cornmeal instead, feel free to sub it back in. As you can see in the original recipe, regular or coarse ground cornmeal works just fine.


Mediterranean Semolina Cookies

3/4 C (90 g) dried fruit
2 T (20 g) flour

5 1/2 oz (155 g) unsalted butter, at room temperature
1/2 C (110 g) brown sugar
1 1/2 T honey
2 large eggs, at room temperature
1/2 tsp vanilla extract
1 1/2 C (210 g) semolina flour (or polenta/cornmeal)
1 C (140 g) flour
2 tsp baking powder
3/4 tsp salt

extra brown sugar or raw sugar for rolling the logs of dough


1. Toss the dried fruit and the 2 T (20 g) of flour together in a small bowl and set aside.


2. In the bowl of a stand mixer, or by hand, beat together the butter, sugar, and honey until smooth and creamy, about one minute. Add the eggs, one at a time, then the vanilla, beating until incorporated.

3. In a separate bowl, whisk together the semolina flour, 1 C flour, baking powder, and salt.

4. Mix the dry ingredients into the beaten butter mixture until incorporated, then stir in the dried fruit.


5. Form the dough into a rectangle 4- by 7-inches (10 by 18 cm), wrap in plastic, and chill the dough for about an hour, or until it’s firm enough to handle.


6. Spread brown or raw sugar liberally over a surface on which to roll the dough into logs. Divide the dough in two, lengthwise, and roll each piece of dough on the brown sugar into a smooth cylinder 7-inches (18 cm) long. Wrap the cylinders and freeze until ready to bake.

(To bake them right away, pinch off pieces of dough about the size of a small unshelled walnut, and roll into balls. Place them evenly spaced on the prepared baking sheet and press them down gently with your hands to flatten them partially.)


7. To bake the cookies, preheat the oven to 325 F (170 C).

8. Line two baking sheets with parchment paper or silicone baking mats.

9. Slice the cookies into 1/4-inch (.75 cm) slices and place them evenly spaced on the prepared baking sheets. The dough is easier to slice when frozen, but if it's too firm or crumbles when you slice it, let it defrost for a few minutes, or reform the individual slices by hand.


10. Bake the cookies for about 12 minutes, rotating the baking sheets midway during baking, until the cookies are very light brown on top. Remove the oven and let cool completely.

Serve the cookies by themselves, alongside a fruit compote, or with a scoop of your favorite ice cream or sorbet.

Storage: The cookies will keep in an airtight container for up to four days. The dough can be refrigerated for up to one week, or frozen for one or two months.


Because these have more fiber, less sugar, and fruit in them, they almost felt like a healthy snack to me. That's justification for making them and eating them whenever you feel hungry, right? Right?

Another crunchy semolina recipe to follow!


Wednesday, July 14, 2010

Plum Tart with Walnut Cream


On this 14th of July, I would like to bring you something from one of my favorite French food blogs. This recipe caught my eye a couple of years ago; I'm not sure why I remembered it this week as I looked for plum recipes - perhaps it was the lovely word "quetsches" for the French plums in the original recipe, or the unique idea of nut cream with plums, or the cute plumpness of the plums in the photo, but regardless, I am glad that it came to mind!


I love eating fresh plums, as I do the many incredible summer fruits available in Israel, but party leftovers left me with enough plums to make my tongue fall out from acidity were I to eat them all myself. So...tart making time!

In my opinion, the walnut cream is the star player in this tart, although it sort of melds with the crust so that eaters may not be aware of its individual contribution. More importantly, the combination of the butter crust with the sweet walnut cream and the tart/sweet juicy plums was magical. As with most fruit desserts, I think this one would be great with other fruits and nuts, so that could be a future project...if I didn't have so many others in mind...


Plum Tart with Walnut Cream

Tarte aux Quetsches et Crème de Noix from Chocolate and Zucchini

For the crust:
- 75 grams (1/3 C plus 1 T) sugar (unrefined or white)
- 150 grams (1 C plus 2 T) flour
- 75 grams butter (salted, or unsalted plus a pinch of salt) -- if you use regular American butter (which has less butterfat than European butter), use 7 tablespoons
- Ice-cold water or milk

For the filling:
- 135 grams (1 1/4 C) shelled walnut halves
- 2 T sugar (white, unrefined, or even honey)
- 1 egg
- 3 T crème fraîche (substitute sour cream or fromage blanc)
- Optional flavoring: 1 teaspoon pure vanilla extract, or 1 teaspoon plum or walnut liqueur, or 1 teaspoon light rum
- 700 grams (1 1/2 lbs) ripe plums of any variety

Preheat the oven to 180°C (350°F). Grease a 10-inch tart pan with butter and set aside.

Prepare the pâte sablée. In the bowl of a mixer or blender, combine the sugar and flour. Add the butter and process in short pulses until the mixture resembles coarse meal. (Alternatively, rub the butter into the dry ingredients by hand with the tips of your fingers or a wire pastry blender.) Add a tablespoon of water or milk and mix again, in short pulses, until it is absorbed. The dough should still be crumbly, but it should clump if you gently squeeze a handful in your hand. If it doesn't, add a little more water -- teaspoon by teaspoon -- and give the dough a few more pulses until it reaches the desired consistency. My crust went funny on me - I may have used the wrong amount/kind of butter, or pulsed the mixture too long - but it still tasted great.

Pour the mixture evenly into the prepared tart pan. Using the heels of your hands and your fingers, press on the dough gently to form a thin layer, covering the surface of the pan and creating a rim all around. Don't worry if the dough feels a little dry, this is normal. (You can prepare the dough up to a day ahead: cover with plastic wrap and refrigerate.) Bake for 15 minutes, until lightly golden.

While the crust par-bakes, prepare the filling. Combine the walnuts and sugar in the bowl of your food processor, and grind to a coarse powder. Add the egg, crème fraîche, and flavoring if using, and mix again. (You can prepare the walnut cream up to a day ahead: transfer to an airtight container, refrigerate, and bring to room temperature before using.) Rinse and dry the plums, cut them in halves, and discard the stones.

Remove the pan from the oven (leave the heat on), and let cool slightly. Spread walnut cream evenly over the tart shell, and arrange the plums on top in a circular pattern starting from the outside. Return to the oven for 30 minutes, until the plums are cooked through and the walnut cream is set. Transfer to a rack to cool completely before serving. The tart is best served on the day it is made, but the leftovers will keep until the next day; cover with foil, refrigerate, and bring to room temperature before eating.

I ate mine with a little leftover fromage blanc (why not?), but it is great all by its lonesome. Happy Bastille Day!